Foolproof Best Weekend Dessert (No-Bake Creamy Layer Dessert)
Introduction
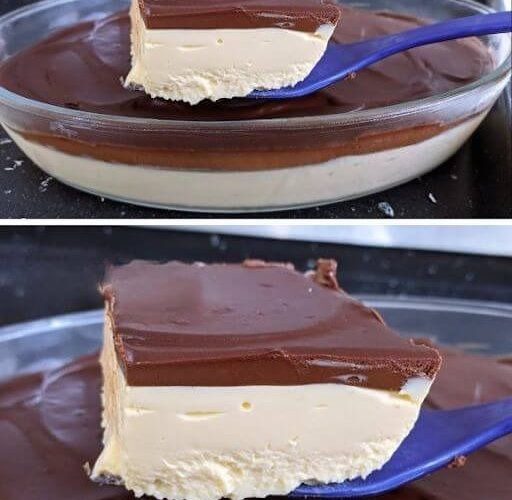
This is a simple, foolproof layered dessert that is perfect for weekends, family gatherings, or when you want something sweet without complicated baking. It is creamy, rich, and customizable, combining biscuits, cream, and a smooth pudding layer. The best part is that it requires no oven and can be prepared in advance.
Ingredients
Biscuit layer
- 2 cups digestive biscuits or graham crackers, crushed
- 3 tablespoons melted butter
- 1 tablespoon sugar (optional)
Cream layer
- 2 cups whipping cream (chilled)
- ½ cup powdered sugar
- 1 teaspoon vanilla extract
Pudding layer
- 2 cups milk
- 3 tablespoons cornflour (cornstarch)
- 3 tablespoons sugar
- 1 teaspoon vanilla extract
- 2 tablespoons cocoa powder (optional for chocolate flavor)
Toppings (optional)
- Chocolate shavings
- Crushed nuts (almonds, walnuts, or pistachios)
- Fresh fruits like strawberries or bananas
- Caramel or chocolate sauce
Step 1: Prepare the Biscuit Base
Crush the biscuits into fine crumbs using a food processor or by placing them in a bag and crushing with a rolling pin.
Mix the crushed biscuits with melted butter and sugar until the texture resembles wet sand. Press this mixture firmly into the bottom of a serving dish to form an even base layer.
Place it in the refrigerator for 15–20 minutes to set.
Step 2: Prepare the Cream Layer
In a chilled bowl, whip the cream using a hand mixer or whisk until it starts to thicken.
Add powdered sugar and vanilla extract, then continue whipping until soft peaks form. The cream should be fluffy but not too stiff.
Keep it refrigerated until needed.
Step 3: Prepare the Pudding Layer
In a saucepan, mix milk, sugar, and cornflour. Stir well to ensure there are no lumps.
Cook over medium heat while stirring continuously. The mixture will gradually thicken into a smooth pudding consistency.
Once thickened, remove from heat and add vanilla extract. For a chocolate version, mix in cocoa powder.
Let the pudding cool slightly before assembling.
Step 4: Assemble the Dessert
Spread the cooled pudding evenly over the chilled biscuit base.
Next, gently spread the whipped cream layer over the pudding. Use a spatula to create a smooth top surface.
Make sure each layer is even for a neat presentation.
Step 5: Chill the Dessert
Cover the dish and refrigerate for at least 4 hours, preferably overnight. This allows the layers to set properly and develop flavor.
Step 6: Add Toppings
Before serving, decorate the top with chocolate shavings, nuts, or fresh fruit. You can also drizzle caramel or chocolate sauce for extra richness.
Serving Suggestions
Serve chilled slices of this dessert after meals or at parties. It pairs well with coffee, tea, or cold drinks.
Tips for Best Results
- Use chilled cream for better whipping.
- Allow each layer to cool before assembling.
- Refrigerate long enough for firm layers.
- Adjust sweetness according to taste.
- Use a clear dish for a beautiful layered presentation.
Variations
- Chocolate version: Add cocoa powder to both pudding and biscuit base.
- Fruit version: Add banana or strawberry slices between layers.
- Coffee flavor: Add a teaspoon of coffee powder to the pudding.
Conclusion
This foolproof layered dessert is creamy, rich, and incredibly easy to make. With simple ingredients and no baking required, it is perfect for weekends and always impresses guests with its smooth layers and delicious taste.