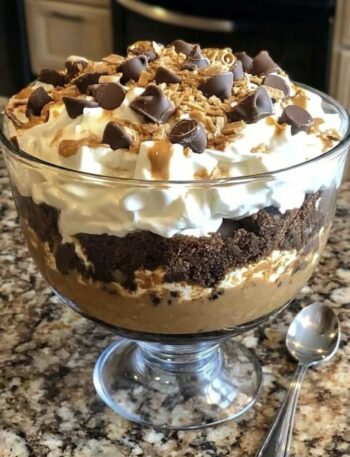
This foolproof creamy chocolate biscuit dessert is the kind of weekend treat that feels special without requiring complicated baking skills, expensive ingredients, or hours in the kitchen. It has layers of crisp chocolate biscuits, silky chocolate cream, and a rich, smooth pudding-like filling that softens the biscuits just enough to create a wonderfully tender texture. After a few hours in the refrigerator, everything comes together into one deliciously creamy dessert that can be sliced or spooned straight from the dish.
It is an excellent choice when you want to prepare dessert ahead of time. In fact, the longer it chills, the better the texture becomes. The biscuits absorb some of the cream while still retaining enough structure to give every bite a satisfying contrast. The chocolate flavor becomes deeper and smoother as the dessert rests, while the creamy layers become beautifully set.
This recipe is especially useful for weekends, family gatherings, dinner parties, birthdays, tea-time treats, or whenever you want an impressive dessert without turning on the oven. You can make it in a large serving dish for a crowd or prepare it in individual glasses for a more elegant presentation.
Preparation Time
Prep Time: 25–30 minutes
Cooking Time: 10–15 minutes
Chilling Time: 4–6 hours
Best Chilling Time: Overnight
Total Time: About 5–7 hours including chilling
Servings: 8–10
Ingredients
For the biscuit layer
300 g chocolate biscuits or plain tea biscuits
3–4 tablespoons melted butter
2 tablespoons milk, if needed
For the creamy chocolate filling
500 ml whole milk
4 tablespoons granulated sugar
3 tablespoons unsweetened cocoa powder
3 tablespoons cornflour or cornstarch
100 g chocolate, finely chopped
1 teaspoon vanilla extract
2 tablespoons butter
A small pinch of salt
For the whipped cream layer
250 ml cold heavy cream or whipping cream
2–3 tablespoons powdered sugar
1 teaspoon vanilla extract
For the topping
50–75 g chocolate, grated or finely chopped
1–2 tablespoons cocoa powder
Chocolate curls, optional
Crushed biscuits, optional
Fresh berries, optional
Chopped nuts, optional
Why This Dessert Is So Foolproof
The beauty of this dessert is that there is no complicated cake batter, no delicate sponge to worry about, and no difficult decorating technique. The biscuit base provides the structure, while the cooked chocolate cream creates the richness. The whipped cream adds lightness, making the finished dessert creamy rather than overly heavy.
The filling is also forgiving. If it becomes slightly thicker than expected, a little extra milk can loosen it. If it seems too thin while warm, it will continue to thicken as it cools. The refrigerator does most of the work.
Another advantage is that the dessert can be prepared several hours before serving. This makes it particularly convenient for weekends because you can prepare it in the morning or afternoon and have dessert ready after dinner.
Step 1: Prepare the Biscuit Crumbs
Place the chocolate biscuits in a food processor and pulse until they become fine crumbs. You can also put the biscuits into a strong resealable bag and crush them with a rolling pin.
You do not necessarily need the crumbs to be perfectly fine. A mixture containing some very small crumbs and a few slightly larger pieces can give the base a pleasant texture.
Transfer the crumbs to a bowl and add the melted butter. Mix thoroughly until the crumbs resemble damp sand.
If the mixture seems very dry, add one tablespoon of milk at a time until it begins to hold together when pressed.
Do not add too much liquid because the biscuits will soften further as the dessert chills.
Step 2: Form the Biscuit Base
Choose a medium-sized rectangular or square serving dish.
Spread approximately two-thirds of the biscuit mixture across the bottom. Press it down firmly with the back of a spoon, the bottom of a glass, or your fingers.
The goal is to create an even layer.
You do not need to press it extremely hard, but it should be compact enough that it does not fall apart when the dessert is served.
Place the dish in the refrigerator while you prepare the chocolate filling.
Reserve the remaining biscuit crumbs for another layer or for decoration.
Step 3: Make the Chocolate Cream Filling
Pour the milk into a medium saucepan while it is still cold.
Add the sugar, cocoa powder, and cornstarch.
Whisk everything together thoroughly before turning on the heat. This is an important step because mixing the cornstarch into cold liquid helps prevent lumps.
Place the saucepan over medium heat.
Continue whisking as the mixture warms.
After several minutes, the mixture will gradually begin to thicken.
Keep stirring continuously, paying particular attention to the bottom and corners of the saucepan.
Once the mixture becomes thick and creamy, reduce the heat.
Add the chopped chocolate.
Continue stirring until the chocolate melts completely and the mixture becomes smooth and glossy.
Add the butter, vanilla extract, and a small pinch of salt.
Stir again until everything is fully incorporated.
The finished chocolate filling should be thick enough to coat the back of a spoon.
Do not worry if it looks slightly loose while hot. It will become considerably thicker as it cools.
Step 4: Cool the Chocolate Filling
Remove the saucepan from the heat.
Allow the chocolate cream to cool for approximately 10–15 minutes.
Stir it occasionally while cooling.
You do not want to pour extremely hot filling over the biscuit base because the heat can soften the base too quickly.
The filling should still be pourable but no longer steaming hot.
Step 5: Add the Chocolate Filling
Remove the biscuit base from the refrigerator.
Pour the chocolate cream over the biscuit layer.
Use a spatula to spread it evenly from corner to corner.
Try to create a smooth surface.
Return the dish to the refrigerator and chill for approximately 30–45 minutes, or until the chocolate layer has cooled and started to set.
This short chilling period makes it easier to add the whipped cream without disturbing the chocolate layer.
Step 6: Prepare the Whipped Cream
Pour the cold heavy cream into a chilled mixing bowl.
Add the powdered sugar and vanilla extract.
Using an electric mixer, beat the cream on medium speed until it becomes thick.
Increase the speed slightly and continue beating until soft-to-medium peaks form.
Be careful not to overbeat the cream.
The cream should be thick enough to spread but still smooth and creamy.
If you prefer a firmer topping, you can beat it until medium-stiff peaks form, but avoid beating it until it becomes grainy.
Step 7: Add the Creamy Layer
Take the chilled dessert from the refrigerator.
Spread the whipped cream evenly over the chocolate layer.
Use a spatula to smooth the surface.
You can leave it perfectly smooth or create decorative swirls using the back of a spoon.
For a more textured homemade appearance, gently drag the spoon across the surface to create soft peaks.
Step 8: Add the Final Biscuit Layer
Sprinkle the remaining biscuit crumbs over the whipped cream.
You can cover the entire surface or sprinkle them lightly so that some of the white cream remains visible.
The combination of chocolate crumbs and cream gives the dessert a beautiful contrast.
Step 9: Add the Chocolate Topping
Grate chocolate directly over the top.
You can use milk chocolate, dark chocolate, or semi-sweet chocolate depending on your preference.
For a stronger chocolate flavor, use dark chocolate.
For a sweeter family-friendly version, milk chocolate works beautifully.
You can also add a light dusting of cocoa powder.
Do not add too much cocoa powder because it can become bitter.
Chocolate curls, chopped nuts, mini chocolate chips, or a few fresh berries can also be used for decoration.
Step 10: Chill Properly
Cover the dessert loosely with plastic wrap or a suitable lid.
Refrigerate for at least 4 hours.
For the best texture, refrigerate overnight.
This chilling period is extremely important.
During this time, the biscuit layer softens slightly, the chocolate filling sets, and the whipped cream becomes firmer.
The result is a dessert that can be served neatly instead of looking like separate ingredients placed into a dish.
The Perfect Texture
When properly chilled, the bottom should be soft enough to cut easily but not completely mushy.
The chocolate layer should be creamy and smooth.
The whipped cream should be light and airy.
The biscuit crumbs on top should retain a little texture.
Every spoonful should contain a combination of biscuit, chocolate cream, and whipped cream.
That combination is what makes this dessert so satisfying.
How to Serve
Take the dessert out of the refrigerator immediately before serving.
Use a sharp spoon or spatula to cut into portions.
If you want clean slices, use a warm knife.
Dip the knife into hot water, wipe it dry, and gently cut through the dessert.
Repeat between slices.
For individual servings, spoon the dessert into small bowls or glasses before chilling.
Individual dessert cups are especially convenient when serving guests because there is no need to slice the dessert at the table.
Chocolate Flavor Variations
For a deeper chocolate flavor, replace some of the milk chocolate with dark chocolate.
For a sweeter dessert, use milk chocolate and slightly reduce the cocoa powder.
For a mocha version, dissolve one teaspoon of instant coffee into the warm chocolate filling.
For a chocolate-orange variation, add a small amount of finely grated orange zest to the chocolate filling.
For a mint chocolate version, add a small amount of peppermint extract to the chocolate cream.
For a hazelnut version, spread a thin layer of chocolate-hazelnut spread over the biscuit base before adding the chocolate filling.
Biscuit Variations
Chocolate sandwich cookies can be used for a richer, sweeter base.
Plain digestive biscuits give the dessert a slightly less sweet flavor.
Tea biscuits are also excellent and are usually easy to find.
Chocolate wafer biscuits create an especially delicate texture after chilling.
You can even combine two different types of biscuits.
For example, use chocolate biscuits for the base and plain biscuits for the topping.
Nutty Version
If you enjoy nuts, add finely chopped roasted almonds, walnuts, pistachios, or hazelnuts.
You can mix the nuts into the biscuit crumbs or sprinkle them over the whipped cream.
For the best flavor, lightly toast the nuts before using them.
Allow them to cool completely before adding them to the dessert.
Toasted nuts add a wonderful aroma and a little crunch.
Fruit Version
Although this is primarily a chocolate dessert, fruit can add freshness.
Strawberries, raspberries, bananas, cherries, or sliced peaches can work beautifully.
If using bananas, add them shortly before serving because they can darken after prolonged refrigeration.
Fresh berries are particularly good because their slight tartness balances the sweetness of the chocolate cream.
Make-Ahead Instructions
This dessert is perfect for making ahead.
You can prepare it one day before serving.
Keep it covered and refrigerated.
If you are preparing it more than one day ahead, wait to add delicate fresh fruit until shortly before serving.
The dessert generally tastes even better after resting overnight because the flavors have time to blend.
Storage
Store leftovers covered in the refrigerator.
They are best enjoyed within 3 days.
Always use a clean serving spoon when removing portions.
Do not leave the dessert at room temperature for extended periods because it contains dairy and whipped cream.
If serving during a gathering, keep the main dish refrigerated and bring it out only when needed.
Can It Be Frozen?
The chocolate biscuit base and chocolate filling can generally be frozen, but the whipped cream topping may change texture after freezing and thawing.
For the best result, prepare the dessert fresh and refrigerate it.
If you do freeze it, cover it extremely well and thaw it slowly in the refrigerator.
Do not thaw it at room temperature.
Helpful Tips for Perfect Results
Use full-fat milk for a richer chocolate filling.
Sift the cocoa powder if it contains lumps.
Always whisk the cornstarch into cold milk before heating.
Stir the chocolate filling continuously while it cooks.
Do not boil the filling aggressively.
Allow the chocolate mixture to cool before adding it to the biscuit layer.
Use cold cream for whipping.
Do not overbeat the whipped cream.
Chill the dessert for at least four hours.
For the cleanest portions, chill overnight.
Add decorative fruit close to serving time.
Use good-quality chocolate because chocolate is one of the main flavors in this dessert.
Common Problems and Solutions
If the chocolate filling has lumps, whisk it vigorously while warm. For an especially smooth result, strain it through a fine sieve before pouring it into the dish.
If the filling is too thick, whisk in a small amount of warm milk.
If the filling is too thin, return it to low heat and cook it for another minute or two while stirring constantly.
If the biscuit base is too crumbly, add a little more melted butter.
If the base becomes too soft, reduce the amount of milk used in the biscuit mixture.
If the whipped cream is too loose, chill the bowl and cream for a few minutes before whipping again.
If the dessert is difficult to slice, it may simply need more chilling time.
A Simple Weekend Presentation
For a casual family dessert, serve generous spoonfuls in small bowls and sprinkle each portion with extra grated chocolate.
For guests, cut neat squares and place each piece on a dessert plate.
Add a few berries beside the portion and finish with a light chocolate drizzle.
You can also serve it in individual glasses with visible layers.
Start with biscuit crumbs, add chocolate cream, then whipped cream, followed by another small layer of crumbs.
Top each glass with grated chocolate.
Why It Works So Well for Weekends
Weekend desserts should ideally be enjoyable to make without becoming an entire afternoon project.
This recipe gives you the rich, layered appearance of a more complicated dessert while relying on straightforward ingredients and simple techniques.
There is no need to decorate a cake perfectly.
There is no need to make pastry.
There is no need to worry about a sponge collapsing.
Once the layers are assembled, the refrigerator does most of the work.
That makes this dessert particularly useful when you are cooking a larger weekend meal and do not want dessert preparation to become stressful.
Serving Suggestions
Serve chilled with coffee, tea, hot chocolate, or a glass of cold milk.
A small scoop of vanilla ice cream can also be served alongside it if you want an extra-indulgent dessert.
For a more balanced presentation, add fresh strawberries or raspberries.
A little caramel sauce drizzled over each serving can add another layer of flavor.
You can also make a simple chocolate sauce by gently melting chocolate with a little cream and drizzling it over the finished dessert.
Recipe Card
Description
A foolproof no-bake chocolate biscuit dessert made with a buttery biscuit base, silky homemade chocolate cream, fluffy whipped cream, and a generous chocolate topping. It is creamy, rich, easy to prepare, and perfect for making ahead for the weekend.
Duration
Prep Time: 30 minutes
Cooking Time: 15 minutes
Chilling Time: 4–6 hours
Total Time: About 5–7 hours
Servings: 8–10
Ingredients
300 g chocolate or tea biscuits
3–4 tablespoons melted butter
2 tablespoons milk if needed
500 ml whole milk
4 tablespoons sugar
3 tablespoons cocoa powder
3 tablespoons cornstarch
100 g chopped chocolate
1 teaspoon vanilla extract
2 tablespoons butter
Pinch of salt
250 ml cold heavy cream
2–3 tablespoons powdered sugar
1 teaspoon vanilla extract
50–75 g grated chocolate for topping
Instructions
Crush the biscuits into fine crumbs and mix them with melted butter. Add a little milk only if necessary. Press two-thirds of the crumbs firmly into the bottom of a serving dish and refrigerate.
Whisk cold milk, sugar, cocoa powder, and cornstarch together in a saucepan. Cook over medium heat while whisking continuously until thickened.
Add chopped chocolate, butter, vanilla, and salt. Stir until smooth and glossy.
Allow the chocolate mixture to cool slightly, then pour it over the chilled biscuit base. Refrigerate until the chocolate layer begins to set.
Whip the cold cream with powdered sugar and vanilla until smooth and fluffy. Spread it evenly over the chocolate layer.
Sprinkle the remaining biscuit crumbs and grated chocolate over the top.
Cover and refrigerate for at least 4 hours, preferably overnight.
Serve chilled and garnish with extra chocolate, berries, nuts, or chocolate curls if desired.