Introduction
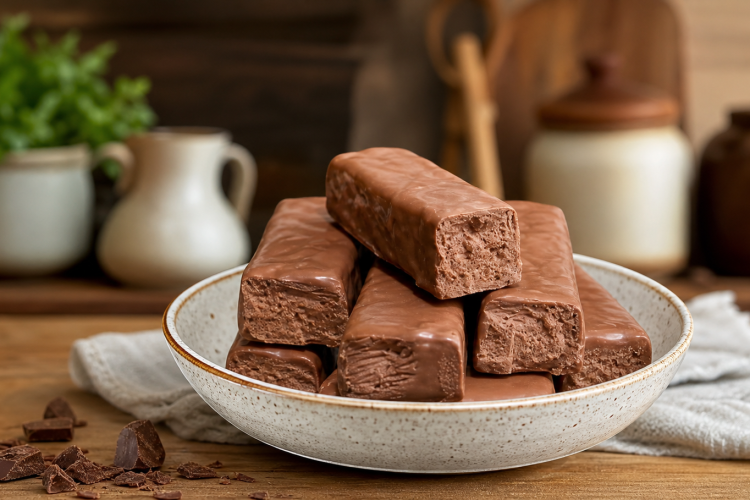
Thermomix chocolate is a wonderfully simple homemade treat that can be prepared with the help of a Thermomix to create a smooth, glossy, rich chocolate mixture with very little effort. Making chocolate at home gives you the opportunity to control the sweetness, texture, richness, and flavor while using ingredients that are easy to find. This recipe is especially useful when you want homemade chocolate bars, chocolate pieces, chocolate bark, or small chocolate treats for family and friends.
The Thermomix makes the process particularly convenient because it can chop, melt, mix, and maintain an even temperature. The most important part of making good chocolate is controlling the heat. Chocolate can become grainy, thick, dull, or difficult to work with if it becomes too hot. Gentle melting and thorough mixing help produce a smooth result.
This recipe can be made with milk chocolate, dark chocolate, or a combination of both. You can also add nuts, dried fruit, coconut, crushed biscuits, coffee, orange zest, peppermint, sea salt, or other favorite ingredients. Once the chocolate is prepared, it can be poured into molds and refrigerated until firm.
Preparation Time
Preparation Time: 10 minutes
Melting and Mixing Time: 10–15 minutes
Chilling Time: 1–2 hours
Total Time: Approximately 1 hour 30 minutes to 2 hours
Servings: Approximately 20–30 pieces, depending on the mold size
Ingredients
300 g good-quality chocolate, broken into small pieces
30 g unsalted butter or cocoa butter
2 tablespoons powdered sugar, optional
1 teaspoon vanilla extract
1 tablespoon milk powder, optional for a creamier milk chocolate flavor
A small pinch of salt
Optional ingredients such as chopped almonds, hazelnuts, pistachios, raisins, dried cranberries, shredded coconut, crushed cookies, or roasted peanuts
For a richer homemade chocolate flavor, cocoa butter is an excellent choice because it keeps the chocolate firm when chilled and gives the finished chocolate a smooth texture. Unsalted butter can also be used when a softer, creamier homemade chocolate is desired.
Choosing the Chocolate
The chocolate you choose will have a major effect on the finished recipe. Dark chocolate creates a deeper, less sweet chocolate flavor, while milk chocolate produces a softer and sweeter taste. White chocolate can also be used, although it requires especially careful temperature control because it is more sensitive to heat.
For a balanced flavor, you can combine dark and milk chocolate. For example, using 200 g dark chocolate and 100 g milk chocolate creates a chocolate that is rich but not overwhelmingly bitter.
Choose chocolate that you genuinely enjoy eating because the flavor becomes even more noticeable when it is turned into homemade chocolate treats.
Preparing the Chocolate
Begin by making sure the Thermomix bowl is completely clean and dry. Even a small amount of water can affect melted chocolate and cause it to seize or become thick and grainy.
Break the chocolate into reasonably small pieces. Smaller pieces melt more evenly than large blocks. Place the chocolate pieces into the Thermomix bowl.
If you are using cocoa butter, cut it into small pieces and add it to the bowl. If using butter instead, add the butter along with the chocolate.
Set the Thermomix to gently heat the chocolate while stirring slowly. A low temperature is important. Chocolate does not need aggressive heating to melt. Gentle heat allows the chocolate to soften gradually while the blades keep the mixture moving.
Continue heating until the chocolate is mostly melted. Stop occasionally to scrape down the sides if necessary. The remaining small pieces should melt from the residual heat and continued stirring.
Avoid overheating the mixture. The goal is a smooth, fluid chocolate rather than a very hot chocolate mixture.
Adding the Remaining Ingredients
Once the chocolate is smooth, add the powdered sugar if you want additional sweetness. If your chocolate is already sweet enough, you can leave the sugar out.
Add vanilla extract and a very small pinch of salt. Salt does not make the chocolate taste salty when used in a small quantity. Instead, it can help emphasize the chocolate flavor and balance sweetness.
If you are using milk powder, add it gradually and mix until completely incorporated.
Continue mixing gently until the mixture becomes smooth and uniform.
The chocolate should look glossy and pour easily. If it appears unusually thick, allow it to warm very gently for a short time while stirring. Do not add water to loosen chocolate because water can cause melted chocolate to seize.
Making Chocolate Bars
Prepare chocolate molds before melting the chocolate. Silicone molds are particularly convenient because the finished chocolate can usually be removed easily once completely firm.
Place the molds on a flat tray. This makes it much easier to transfer them to the refrigerator without spilling.
Pour the melted chocolate into the molds. Fill each cavity evenly.
Tap the tray gently against the counter a few times to release larger air bubbles. Do this carefully so the chocolate does not spill.
If you want plain chocolate bars, simply leave the molds as they are.
If you want chocolate with toppings, sprinkle the toppings over the chocolate before it begins to set.
Adding Nuts
Nuts are one of the easiest ways to customize homemade Thermomix chocolate.
Roasted almonds, hazelnuts, pistachios, peanuts, walnuts, pecans, and cashews all work well. Chop larger nuts into smaller pieces so that the finished chocolate is easier to break and eat.
You can stir the nuts directly into the melted chocolate or sprinkle them over the chocolate after pouring it into the molds.
Roasting the nuts beforehand gives them a deeper flavor and makes the chocolate taste more like a confectionery-style treat.
Making Chocolate Bark
Chocolate bark is one of the easiest versions of this recipe.
Line a tray with baking paper. Pour the melted chocolate onto the paper and spread it into an even layer using a spatula.
The chocolate does not need to be perfectly rectangular. A rustic appearance is part of the charm of chocolate bark.
Scatter chopped nuts, dried fruit, coconut, crushed biscuits, or a small amount of flaky salt over the surface.
Place the tray into the refrigerator until the chocolate is completely firm.
Once set, remove the chocolate from the paper and break it into irregular pieces.
Making Chocolate With Dried Fruit
Dried fruit adds natural sweetness and a pleasant chewy texture.
Dried cranberries, raisins, chopped dates, dried apricots, cherries, and sultanas can all be used.
Make sure the dried fruit is not wet before adding it to chocolate. Excess moisture can affect the chocolate texture.
For a festive combination, try dark chocolate with dried cranberries and pistachios. For a sweeter version, milk chocolate with raisins and almonds works beautifully.
Making Coconut Chocolate
Coconut and chocolate are a classic combination.
Add finely shredded coconut to the melted chocolate and mix gently. You can also sprinkle toasted coconut over the top after pouring the chocolate into molds.
For a stronger coconut flavor, replace a portion of the nuts with toasted coconut.
Allow the chocolate to chill completely before removing it from the molds.
Making Peppermint Chocolate
For a refreshing variation, add a very small amount of peppermint extract to the melted chocolate.
Peppermint extract can be powerful, so begin with a small quantity. Too much can overpower the chocolate.
Dark chocolate works particularly well with peppermint because its bitterness balances the strong mint flavor.
Making Orange Chocolate
Orange and chocolate create another excellent combination.
Add finely grated orange zest to the chocolate while it is still warm. Use only the colored outer portion of the peel and avoid adding large amounts of the bitter white pith.
You can also use a small amount of natural orange extract if desired.
Dark chocolate is particularly good with orange because the citrus aroma brightens the rich chocolate flavor.
Making Coffee Chocolate
Coffee can deepen the flavor of chocolate without making the finished product taste strongly like coffee.
Mix a small amount of finely powdered instant espresso or coffee powder into the melted chocolate.
The coffee should be completely dissolved or finely incorporated so that there are no unpleasant granules.
This variation is especially delicious with dark chocolate.
Making Salted Chocolate
For a simple gourmet-style chocolate, sprinkle a small amount of flaky sea salt over the surface before the chocolate sets.
Do not use too much salt. A few flakes are enough.
The contrast between sweet chocolate and tiny bursts of salt creates a more complex flavor.
Using Chocolate Molds
Chocolate molds come in many shapes and sizes. Small square molds are useful for bite-sized chocolates, while larger molds are better for chocolate bars.
Silicone molds are convenient because the chocolate can usually be pushed out once completely chilled.
For decorative chocolates, you can layer different chocolates.
Pour a thin layer of dark chocolate into the mold, allow it to partially set, then add milk chocolate on top.
Another option is to drizzle white chocolate over dark chocolate for a decorative effect.
Chilling the Chocolate
Once the molds are filled, place them carefully in the refrigerator.
The chocolate needs enough time to become completely firm. Small chocolates may set relatively quickly, while thick bars can require longer.
Avoid moving the molds repeatedly while the chocolate is setting.
Once the chocolate is firm, gently remove each piece from the mold.
If the chocolate sticks, allow it to chill longer rather than forcing it out.
Texture of Homemade Thermomix Chocolate
The texture depends on the chocolate used, the added ingredients, and how the chocolate is cooled.
A chocolate made with good-quality dark chocolate should become firm and have a satisfying snap when chilled.
Milk chocolate tends to be softer and creamier.
Adding butter can make homemade chocolate softer than chocolate made primarily with cocoa butter.
Nuts and dried fruit naturally change the texture by adding crunch and chewiness.
If you want a very firm chocolate, cocoa butter is generally a better choice than ordinary butter.
How to Get Smooth Chocolate
The first rule is to keep the Thermomix bowl completely dry.
The second is to avoid excessive heat.
The third is to use good-quality chocolate.
The fourth is to make sure any flavoring ingredients are compatible with chocolate and do not introduce unnecessary moisture.
Chocolate should be melted slowly and mixed gently.
If the chocolate becomes thick, do not immediately increase the temperature dramatically. Gentle heat and continued stirring are usually enough.
Tempering the Chocolate
If you want chocolate with a professional-looking shine and a crisp snap, you can temper it after melting.
Tempering involves carefully controlling the temperature of chocolate so that the cocoa butter crystals form a stable structure.
This step is more advanced and requires a reliable thermometer.
For a simple homemade chocolate recipe, tempering is optional. Refrigerated chocolate will still taste delicious even if it does not have the same glossy finish as professionally tempered chocolate.
If you plan to give the chocolates as gifts or want them to remain firm at room temperature, tempering can be worthwhile.
Storage
Store finished chocolate in an airtight container.
Keep it in a cool, dry place away from sunlight and heat.
If your kitchen is warm, refrigeration may be necessary.
When storing chocolate in the refrigerator, place it inside an airtight container to protect it from moisture and odors from other foods.
Allow refrigerated chocolate to sit at room temperature for a few minutes before eating if you prefer a softer texture.
Freezing Homemade Chocolate
Homemade chocolate can generally be frozen when properly wrapped.
Place the chocolate in an airtight freezer-safe container or tightly sealed bag.
Separate layers with baking paper if necessary.
When ready to eat, allow the chocolate to thaw gradually while still sealed. This helps reduce condensation on the surface.
Keep in mind that freezing can sometimes affect the appearance or texture, so refrigeration is usually preferable for short-term storage.
Serving Ideas
Homemade Thermomix chocolate can be served as a simple dessert after dinner.
It can also be placed on a dessert platter with fresh fruit, biscuits, nuts, and other sweets.
Break chocolate bark into small pieces and serve it alongside tea or coffee.
You can also chop homemade chocolate and use it as a topping for ice cream, yogurt, pancakes, waffles, cakes, brownies, cheesecakes, or oatmeal.
Small homemade chocolates make attractive edible gifts when wrapped individually in food-safe packaging.
Using the Chocolate in Baking
This chocolate can be chopped and added to cookies, muffins, brownies, cakes, or sweet breads.
For cookies, roughly chop the chocolate into small pieces before adding it to the dough.
For brownies, larger chunks create pockets of melted chocolate.
You can also melt leftover homemade chocolate again and drizzle it over baked desserts.
Flavor Variations
There are almost endless ways to change this recipe.
For a nutty chocolate, add roasted almonds and hazelnuts.
For a tropical version, add coconut and dried pineapple.
For a festive chocolate, combine dark chocolate, cranberries, pistachios, and orange zest.
For a simple children’s treat, use milk chocolate with colorful sprinkles.
For a sophisticated version, use dark chocolate with roasted hazelnuts and a tiny amount of flaky sea salt.
For a coffee-inspired version, combine dark chocolate and espresso powder.
For a refreshing dessert, add peppermint.
For a citrus variation, use orange zest.
For a crunchy biscuit chocolate, mix in crushed cookies.
For a peanut butter chocolate, swirl a small amount of smooth peanut butter into the melted chocolate before chilling.
Peanut Butter Chocolate
To make peanut butter chocolate, prepare the melted chocolate as described above.
Pour part of the chocolate into the mold.
Add small spoonfuls of smooth peanut butter.
Cover with the remaining chocolate.
Use a toothpick to create a gentle swirl if desired.
Chill until firm.
The combination of creamy peanut butter and rich chocolate makes this version particularly satisfying.
Chocolate With Biscuits
Crushed biscuits can turn simple chocolate into a crunchy homemade confection.
Choose plain tea biscuits, digestive biscuits, graham-style biscuits, or another crisp cookie.
Crush them into small pieces rather than turning them completely into crumbs.
Stir them into the melted chocolate or sprinkle them over the chocolate after it has been poured into the molds.
Allow the chocolate to set completely before breaking it into pieces.
Tips for Better Results
Always begin with a dry Thermomix bowl.
Break chocolate into smaller pieces before melting.
Use low, gentle heat.
Avoid overheating chocolate.
Stir sufficiently so that all pieces melt evenly.
Use good-quality ingredients.
Prepare your molds before melting the chocolate.
Do not add water.
Keep toppings dry.
Allow the chocolate to become completely firm before removing it from the molds.
Store finished chocolate in an airtight container.
If the weather is warm, keep the chocolate refrigerated.
Common Problems and Solutions
If the chocolate is grainy, it may have been overheated or exposed to moisture. Continue gentle mixing and avoid adding any liquid.
If the chocolate is too thick, gentle warming may help. Avoid suddenly increasing the temperature.
If the chocolate will not set firmly, check the amount of butter or other soft ingredients used. Too much added fat can create a softer chocolate.
If the surface has white marks, the chocolate may have experienced temperature changes or cocoa butter/sugar bloom. It can still be perfectly safe to eat, although the appearance may not be as glossy.
If the chocolate sticks to the mold, chill it longer and try again.
Why Make Chocolate in a Thermomix?
The Thermomix is convenient because several preparation steps can be handled in one bowl.
The controlled heating function allows chocolate to be warmed gently while the blades keep the mixture moving.
This reduces the need for several separate pieces of equipment and makes small batches particularly easy.
The recipe can also be adapted quickly. Once you understand the basic melting process, you can create different flavors depending on what you have available in the kitchen.
Homemade Chocolate for Gifts
Homemade chocolate is a lovely edible gift.
Prepare several varieties and place them in separate bags or small food-safe boxes.
You could make plain dark chocolate, nut chocolate, coconut chocolate, orange chocolate, and salted chocolate.
Decorate the packaging with simple labels describing each flavor.
Make sure the chocolate is completely firm before packaging it.
If the weather is hot, keep the chocolates cool during storage and transportation.
Nutritional Considerations
Chocolate can provide cocoa-derived compounds and minerals, especially when using dark chocolate with a high cocoa percentage.
Nuts can add protein, healthy fats, fiber, vitamins, and minerals.
Dried fruit adds sweetness and carbohydrates.
However, homemade chocolate remains an energy-dense food, so it is best enjoyed in reasonable portions.
The nutritional content will vary considerably depending on the type of chocolate, butter or cocoa butter, sugar, nuts, and other ingredients used.