Introduction
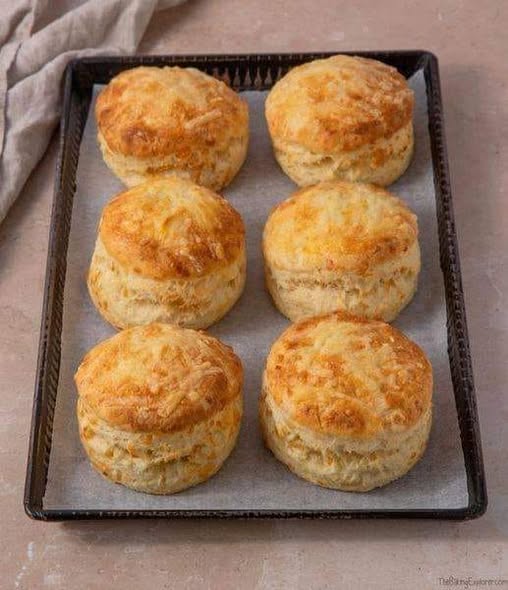
Air fryer cheese scones are one of those simple homemade recipes that can turn a handful of everyday ingredients into something warm, comforting, and incredibly delicious. These savory scones are soft and tender in the center, lightly crisp and golden on the outside, and filled with the rich flavor of melted cheddar cheese. They are quick enough to prepare for a weekend breakfast, easy enough for an afternoon snack, and satisfying enough to serve alongside soup or a light meal. Because they are cooked in the air fryer, they do not require a long oven preheating time, and the smaller cooking space helps the scones develop a beautifully browned surface while keeping the inside soft.
Cheese scones are especially enjoyable when served warm. When they first come out of the air fryer, the cheese is still fragrant and slightly melted, while the crumb is tender and delicate. A little butter spread over a warm scone melts into all the small layers, making every bite rich and flavorful. They can also be served with cream cheese, eggs, soup, or a simple salad. Their savory flavor makes them very versatile, so they can easily move from breakfast to afternoon tea to dinner without feeling out of place.
The secret to good cheese scones is not complicated. The most important things are keeping the butter cold, handling the dough gently, using enough cheese for good flavor, and avoiding overmixing. Scone dough does not need to be kneaded like bread dough. In fact, too much handling can develop the gluten in the flour and result in a firm, heavy scone. The goal is to bring everything together just until a soft dough forms.
The air fryer is particularly useful for this recipe because it cooks the scones quickly and gives them a lovely golden exterior. Depending on the size of your air fryer and the thickness of your scones, they can be ready in around 10 to 14 minutes. Since air fryers vary, it is important to begin checking them toward the lower end of the cooking time. You want the tops to be golden and the centers fully cooked without allowing the bottoms to become overly dark.
These cheese scones are also easy to customize. Sharp cheddar gives them a strong, savory cheese flavor, while mozzarella creates a milder and stretchier result. You can add chopped chives, parsley, green onions, cooked bacon, chili flakes, or other favorite seasonings. The basic recipe remains simple, but small additions can give the scones a completely different character.
Preparation Time
- Prep Time: 15 minutes
- Air Frying Time: 10–14 minutes
- Cooling Time: 5 minutes
- Total Time: Approximately 30–35 minutes
Servings
Makes approximately 8–10 medium cheese scones, depending on the size and shape.
Ingredients
- 2 cups all-purpose flour
- 1 tablespoon baking powder
- ½ teaspoon salt
- ½ teaspoon black pepper
- ¼ teaspoon garlic powder, optional
- ¼ cup cold butter, cut into small cubes
- 1 cup grated cheddar cheese, plus extra for topping if desired
- ¾ cup cold milk
- 1 egg, beaten, for brushing the tops, optional
Choosing the Cheese
- Cheddar is an excellent choice for these scones because it melts well and provides a rich savory flavor. Sharp cheddar works particularly well because its stronger taste remains noticeable after baking. Mild cheddar can also be used if you prefer a softer cheese flavor.
- You can grate the cheese yourself or use pre-grated cheese. Freshly grated cheddar generally melts more smoothly because it does not contain as many anti-caking ingredients as some packaged shredded cheeses. If you have a block of cheese available, grating it just before preparing the dough can make the scones especially flavorful.
- For a different variation, you can replace some or all of the cheddar with mozzarella, Monterey Jack, Colby, or another good melting cheese. A combination of cheeses can also be used.
Why Cold Butter Matters
- Cold butter is one of the most important ingredients in a good scone. When cold pieces of butter are rubbed into the flour, some small pieces remain throughout the mixture. During cooking, those pieces melt and create little pockets of moisture and fat. This contributes to a tender, flaky texture.
- If the butter becomes warm before the scones go into the air fryer, the dough can become greasy and heavy. For this reason, keep the butter refrigerated until you are ready to use it. If your kitchen is warm, work relatively quickly and avoid handling the dough more than necessary.
Step 1: Prepare the Dry Ingredients
- Begin by placing the all-purpose flour in a large mixing bowl. Add the baking powder, salt, black pepper, and garlic powder if you are using it.
- Use a whisk, fork, or spoon to mix the ingredients thoroughly. Make sure the baking powder and seasonings are evenly distributed throughout the flour. This is important because you want every scone to have a balanced flavor and enough baking powder to rise properly.
- The black pepper adds a gentle savory warmth that works beautifully with cheddar. Garlic powder is optional, but even a small amount can give the scones an appealing background flavor without overpowering the cheese.
- Do not add the cheese or butter yet. The dry ingredients should be evenly combined first.
Step 2: Add the Cold Butter
- Take the cold butter from the refrigerator and cut it into small cubes. Add the butter to the flour mixture.
- Using your fingertips, a pastry cutter, or two knives, work the butter into the flour. If using your fingers, gently rub the butter between your fingertips and thumbs until the mixture resembles coarse breadcrumbs.
- Do not try to completely eliminate every piece of butter. A few small pieces of butter remaining in the mixture are actually helpful. These pieces will melt during air frying and contribute to the soft and slightly flaky texture.
- The mixture should look crumbly rather than smooth. You should still be able to see tiny pieces of butter throughout the flour.
- Try not to squeeze or knead the mixture excessively. The longer you handle it, the warmer the butter becomes.
Step 3: Add the Cheese
- Add the grated cheddar cheese to the flour and butter mixture.
- Stir gently with a wooden spoon or spatula until the cheese is evenly distributed. Break apart any large clumps of shredded cheese so that it is spread throughout the mixture.
- Distributing the cheese well at this stage helps ensure that every scone contains plenty of cheesy flavor.
- If you are using additional ingredients such as chopped chives, parsley, cooked bacon, or chili flakes, they can also be added at this stage.
Step 4: Add the Cold Milk
- Make a small well in the center of the dry mixture and gradually add the cold milk.
- Begin with most of the milk rather than immediately adding every drop. Stir gently with a spatula or wooden spoon as you pour.
- The mixture will begin to come together into a soft, slightly rough dough. If it still looks very dry and crumbly after mixing, add a small amount of the remaining milk. Add it gradually because the exact amount needed can vary depending on the flour and the size of your measuring cups.
- The finished dough should be soft and slightly tacky but should not be extremely wet or sticky.
- Avoid mixing for too long. As soon as there are no large areas of dry flour and the dough can be gathered together, stop mixing.
- Overmixing is one of the easiest ways to make scones dense. Unlike bread dough, scone dough does not need extensive kneading.
Step 5: Bring the Dough Together
- Lightly flour a clean work surface and transfer the dough onto it.
- Use your hands to gently gather the dough together. If there are a few dry crumbs around the edges, press them into the dough rather than kneading everything repeatedly.
- Pat the dough into a rough round. It should be approximately 1 to 1½ inches thick.
- The thickness is important. If you make the dough too thin, the scones may cook quickly but will not have the soft, substantial center that makes a good cheese scone. If they are extremely thick, the outside may brown before the center is completely cooked.
- Keep the handling light and gentle.
Step 6: Shape the Scones
- You can shape the scones in several ways.
- For traditional wedge-shaped scones, pat the dough into a round and cut it into 8 equal wedges using a sharp knife.
- For round scones, lightly flour a biscuit cutter or cookie cutter and press it straight down into the dough. Avoid twisting the cutter because twisting can seal the edges and interfere with the rise.
- You can also use a glass if you do not have a cutter, although a proper cutter generally gives cleaner edges.
- Gather any remaining dough scraps and gently bring them together. Avoid repeatedly kneading the scraps. If you work the dough too much, the second batch may be slightly firmer than the first.
Step 7: Prepare the Air Fryer
- Preheat the air fryer to 180°C (350°F) for approximately 3–5 minutes.
- Preheating helps the scones begin cooking immediately and can encourage a better rise. It also helps create a more evenly browned exterior.
- Different air fryers heat differently, so if your model tends to run hot, you may need to reduce the temperature slightly or shorten the cooking time.
- If your air fryer requires preheating according to its manufacturer’s instructions, follow those instructions.
Step 8: Prepare the Scones for Air Frying
- Place the shaped scones into the air fryer basket in a single layer.
- Leave some space between each scone. The dough will expand as it cooks, and good air circulation helps the exterior brown evenly.
- Depending on the size of your air fryer, you may need to cook the scones in two batches. Avoid overcrowding the basket. It is better to cook them in smaller batches than to place them too close together.
- For a beautiful golden top, beat one egg in a small bowl and lightly brush it over the tops of the scones.
- The egg wash is optional. It creates a shiny golden finish, but the scones will still taste delicious without it.
- If desired, sprinkle a little extra grated cheddar over the top before cooking.
- Do not add too much cheese to the surface because cheese that hangs over the edges can melt into the air fryer basket and brown quickly.
Step 9: Air Fry the Cheese Scones
- Place the basket into the preheated air fryer.
- Cook the scones at 180°C (350°F) for approximately 10–14 minutes.
- Start checking around 10 minutes. Smaller scones may finish sooner, while thicker or larger scones may require a few additional minutes.
- The tops should be golden brown and the edges should look set. The scones should feel lightly firm when touched but should not be hard.
- If you carefully separate one scone or check the center, it should look cooked and fluffy rather than wet or doughy.
- If the tops are becoming too dark before the centers are finished, reduce the temperature slightly and continue cooking.
- Because air fryer models differ considerably, use the first batch to determine the ideal cooking time for your particular appliance.
Step 10: Remove and Cool
- When the scones are fully cooked, carefully remove them from the air fryer basket.
- Place them on a wire rack or clean plate and let them rest for about 5 minutes.
- Although it can be tempting to eat them immediately, allowing them to cool briefly gives the interior time to finish setting. The texture will become softer and more cohesive.
- They are best served warm or slightly warm.
Texture of the Finished Scones
- A properly cooked air fryer cheese scone should have a lightly crisp and golden exterior with a soft, tender interior.
- The center should not resemble bread or cake. It should have a delicate, crumbly texture that breaks apart easily when cut or pulled.
- The cheddar should be distributed throughout the scone, providing small pockets of savory cheese flavor.
- If your scones turn out very dense, the most likely causes are overmixing, too much flour, warm butter, or an insufficient amount of liquid.
- If they spread too much, the butter may have become too warm or the dough may have been too wet.
- If they are dry, they may have been overbaked or the dough may have contained too much flour.
How to Make Extra-Fluffy Cheese Scones
- For particularly tender scones, keep all your ingredients as cool as practical. Cold butter and cold milk help maintain the right dough texture.
- Measure the flour carefully. Too much flour can make the dough dry and heavy.
- Do not knead the dough like bread. Simply mix until it comes together.
- Keep the dough reasonably thick when shaping.
- Use fresh baking powder for the best rise.
- Avoid repeatedly reshaping the dough scraps.
- Do not overcrowd the air fryer basket.
Adding Herbs
- Cheese and herbs make an excellent combination.
- Finely chopped fresh chives can provide a mild onion flavor. Parsley adds freshness and color, while finely chopped green onions create a slightly stronger savory taste.
- You can add approximately 1–2 tablespoons of chopped herbs to the dough along with the cheese.
- Dried herbs can also be used, but use them sparingly because their flavor is more concentrated.
Garlic Cheese Scones
- For a stronger garlic flavor, increase the garlic powder slightly or add a small amount of finely minced fresh garlic.
- Garlic powder is usually easier to distribute evenly throughout the dough.
- You can also brush the warm scones lightly with garlic butter after cooking. This creates an especially fragrant finish.
Spicy Cheese Scones
- If you enjoy spicy food, add a pinch of chili flakes to the dry ingredients.
- You can also add finely chopped fresh chili or a little cayenne pepper.
- For an especially flavorful version, combine sharp cheddar with chili flakes and chopped green onions.
- The spice should complement the cheese rather than completely overpower it, so begin with a small amount and increase it in future batches if desired.
Bacon Cheese Scones
- Cooked bacon can turn these simple scones into a hearty breakfast treat.
- Cook the bacon until crisp, allow it to cool, and then chop it into small pieces.
- Add approximately ¼ to ½ cup of cooked bacon pieces to the dough along with the cheddar.
- Make sure the bacon is not hot when added to the mixture because hot bacon can soften the butter and affect the dough.
Different Cheese Combinations
- Cheddar and mozzarella create a mild, creamy combination.
- Cheddar and Monterey Jack provide a smooth and rich flavor.
- Cheddar and Parmesan create a stronger, more savory scone.
- A little Parmesan can also be sprinkled on top before air frying for a flavorful crust.
- When combining cheeses, choose varieties that melt well and avoid adding so much cheese that the dough becomes difficult to hold together.
Serving Suggestions
- Air fryer cheese scones are excellent with a little butter.
- Slice one open while it is still warm and allow the butter to melt into the soft center.
- Cream cheese is another delicious option. The cool, creamy texture contrasts nicely with the warm savory scone.
- These scones also pair beautifully with scrambled eggs, fried eggs, omelets, or breakfast vegetables.
- For lunch or dinner, serve them alongside tomato soup, chicken soup, vegetable soup, mushroom soup, or creamy potato soup.
- They can also be served as part of a tea-time spread with other savory snacks.
Breakfast Serving Idea
- For a filling breakfast, serve a warm cheese scone with scrambled eggs and a cup of tea or coffee.
- You can slice the scone horizontally and fill it with a fried egg, a little cream cheese, and fresh herbs.
- Because the scones are already flavorful, they do not require complicated toppings.
Soup Serving Idea
- Cheese scones are a wonderful alternative to regular bread when serving soup.
- The buttery, cheesy flavor complements creamy soups particularly well.
- Serve one or two warm scones alongside a bowl of soup, and use the scone to soak up the remaining soup from the bowl.
Storage
- Allow leftover scones to cool completely before storing them.
- Place them in an airtight container and keep them at room temperature for approximately 1–2 days.
- For longer storage, refrigerate them in a sealed container.
- Because homemade scones are best when fresh, reheating is recommended before serving leftovers.
Reheating in the Air Fryer
- To bring leftover cheese scones back to life, place them in the air fryer at approximately 160°C (320°F) for 3–5 minutes.
- This gently warms the center and restores some of the crispness to the outside.
- Avoid overheating them because excessive reheating can dry out the interior.
Freezing the Scones
- These cheese scones can also be frozen.
- Once completely cooled, place them in a freezer-safe container or bag. Separate layers with parchment paper if necessary to prevent them from sticking together.
- They can be frozen for several weeks.
- For best results, thaw them and then warm them briefly in the air fryer before serving.
- You can also freeze unbaked shaped scones. Arrange the shaped dough pieces on a tray and freeze until firm, then transfer them to a freezer-safe bag or container.
- When ready to cook, they can generally be cooked from frozen with additional cooking time, although you should monitor them carefully because air fryer performance varies.
Common Mistakes to Avoid
- One common mistake is using warm butter. Warm butter can blend too completely into the flour and prevent the scones from developing their tender texture.
- Another mistake is adding too much flour while shaping the dough. Use only enough flour to prevent excessive sticking.
- Overmixing is another major problem. Once the dough comes together, stop working it.
- Do not press the dough too thin.
- Do not overcrowd the air fryer.
- Do not rely entirely on the exact cooking time. Air fryers differ in size, heating strength, and airflow, so visual cues are important.
Helpful Tips
- Use cold butter straight from the refrigerator.
- Use cold milk.
- Grate the cheese before beginning the recipe.
- Do not overmix the dough.
- Keep the dough about 1 to 1½ inches thick.
- Preheat the air fryer if your appliance allows it.
- Leave enough space between the scones.
- Use an egg wash for a deeper golden color.
- Check the scones early because smaller pieces can cook quickly.
- Let them rest for a few minutes after cooking.
- Serve them warm for the best texture and flavor.
Making the Dough Ahead
- If you want to prepare the recipe ahead of time, you can shape the scones and keep them covered in the refrigerator for a short period before cooking.
- Keeping the shaped dough cold can actually help preserve the butter and make the final scones tender.
- When you are ready to cook, place them directly into the preheated air fryer and cook according to the normal method, adding a little extra time if necessary.
Adjusting the Dough
- Different brands of flour absorb liquid differently, so the exact amount of milk may vary slightly.
- If the dough appears very dry and refuses to come together, add milk one teaspoon or tablespoon at a time.
- If the dough is excessively sticky, add a small amount of flour.
- Avoid making the dough too dry simply because you are worried about stickiness. Slightly soft dough generally produces more tender scones than a stiff dough.
Making Smaller Scones
- For snack-size scones, divide the dough into smaller portions or use a smaller cutter.
- Smaller scones will cook faster, so begin checking them after approximately 8–10 minutes.
- They are ideal for parties, lunch boxes, tea gatherings, or serving alongside soup.
Making Larger Scones
- For larger breakfast-size scones, shape the dough into a thicker round and cut fewer pieces.
- Larger scones may require additional cooking time.
- Keep an eye on the surface. If the tops brown too quickly while the centers remain undercooked, lower the temperature slightly and continue cooking until the center is done.
Flavor and Aroma
- The combination of butter, cheddar, black pepper, and garlic powder creates a warm and savory aroma as the scones cook.
- The cheddar becomes especially fragrant in the air fryer, and the exterior develops a lightly toasted flavor.
- If you add herbs, bacon, or chili, the aroma becomes even more pronounced.
- These scones are particularly inviting when served fresh because the warm cheese aroma is strongest immediately after cooking.
Nutritional Benefits
- These cheese scones provide carbohydrates from the flour, protein and calcium from the cheese and milk, and energy from the butter and cheese.
- Adding herbs such as parsley or chives contributes small amounts of vitamins and antioxidants.
- For a more balanced meal, serve the scones alongside eggs, fresh vegetables, fruit, or a bowl of soup.
- Because these are rich savory baked goods, they are best enjoyed as part of a balanced meal or snack rather than relying on them as the only component of a meal.
Making Them More Filling
- For a more substantial breakfast, pair one cheese scone with eggs and vegetables.
- You can also serve them with grilled tomatoes, sautéed mushrooms, spinach, or avocado.
- For lunch, combine a scone with a fresh salad and a bowl of soup.
- This turns a simple snack into a more complete meal.
Why Air Fryer Cheese Scones Are Special
- The biggest advantage of this recipe is its simplicity. There is no complicated technique, no yeast, and no long rising period.
- The baking powder provides the lift, while cold butter helps create tenderness. The cheese brings richness and savory flavor, and the air fryer quickly cooks the shaped dough until golden.
- The result is a homemade baked treat without needing to turn on a large oven.
- The recipe is also flexible. You can keep it simple with cheddar and black pepper or add herbs, garlic, bacon, chili, or different cheeses depending on what you have available.