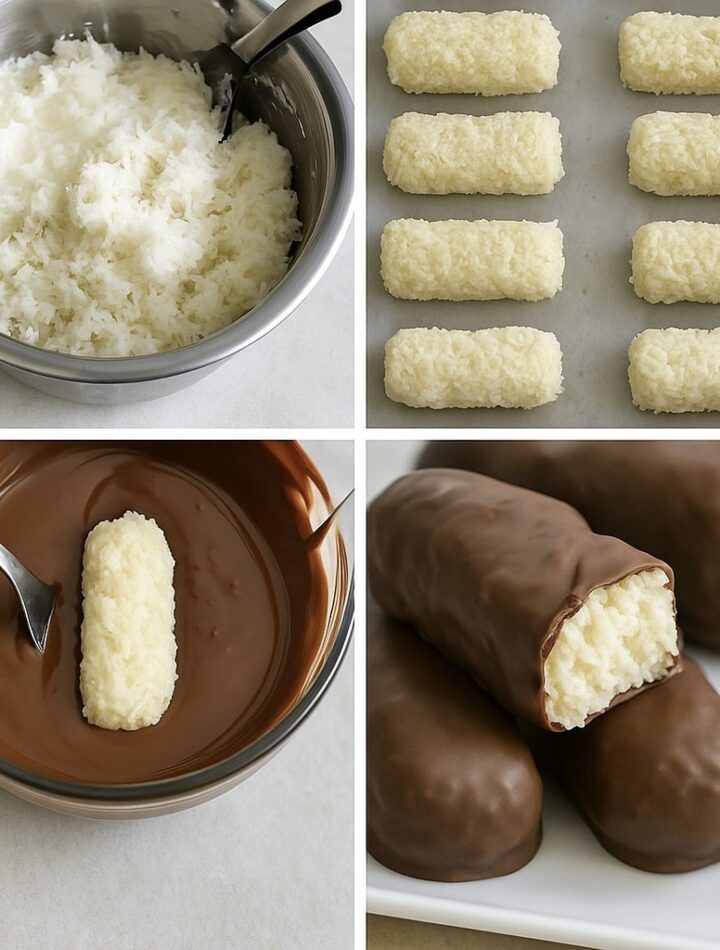
These keto bounty bars are a low-carb, sugar-free version of the classic coconut chocolate bar. They taste rich, creamy, and chocolatey while staying suitable for a ketogenic diet. The texture is soft coconut filling coated in a crisp chocolate shell.
PART 1: INGREDIENTS
1. Coconut filling
- 2 cups unsweetened shredded coconut
- 1/2 cup coconut cream (thick part from a can of coconut milk)
- 3 to 4 tablespoons powdered erythritol or another keto sweetener
- 1 teaspoon vanilla extract
- 2 tablespoons melted coconut oil
- Pinch of salt
2. Chocolate coating
- 150 g sugar-free dark chocolate (at least 85% cocoa or keto-friendly chocolate)
- 2 tablespoons coconut oil (helps make coating smooth and snappy)
- Optional: 1 tablespoon cocoa butter (for extra shine and firmness)
PART 2: PREPARING THE COCONUT FILLING
Step 1: Mix dry coconut base
In a mixing bowl:
- Add shredded coconut
- Add powdered erythritol
- Add a pinch of salt
Mix well so sweetener is evenly distributed.
Step 2: Add wet ingredients
Add:
- Coconut cream
- Melted coconut oil
- Vanilla extract
Mix thoroughly until the mixture becomes sticky and moldable.
Why:
The mixture should hold shape when pressed. If it is too dry, add a little more coconut cream.
Step 3: Shape the bars
- Line a tray with parchment paper
- Take small portions of mixture
- Shape into rectangular bars or small logs
Press firmly so they stay compact.
Step 4: Chill
Place tray in refrigerator for:
- 1 to 2 hours
Or freezer for:
- 30 to 40 minutes
Why:
Chilling firms up the coconut filling so it doesn’t break during coating.
PART 3: PREPARING CHOCOLATE COATING
Step 5: Melt chocolate
In a heatproof bowl:
- Add sugar-free chocolate
- Add coconut oil
Melt using microwave in short bursts or a double boiler.
Stir until smooth and glossy.
Step 6: Adjust consistency
Chocolate should be:
- Smooth
- Slightly runny
- Easy to coat
If too thick, add a little more coconut oil.
PART 4: COATING THE BARS
Step 7: Dip bars
- Remove coconut bars from fridge
- Dip each bar into melted chocolate
- Use fork or spoon to coat evenly
- Let excess chocolate drip off
Step 8: Set on tray
- Place coated bars on parchment paper
- Repeat until all bars are coated
Step 9: Optional second coating
For thicker chocolate shell:
- Chill first layer for 10 minutes
- Dip again in chocolate
PART 5: SETTING AND CHILLING
Step 10: Refrigerate
Place coated bars in fridge for:
- 1 to 2 hours
Or freezer for:
- 20–30 minutes
Chocolate will harden and become crisp.
PART 6: SERVING
Step 11: Serve cold
Serve directly from fridge for best texture.
Best served:
- As a snack
- With coffee
- As a keto dessert after meals
TEXTURE AND FLAVOR PROFILE
These keto bounty bars will be:
- Soft and creamy inside
- Slightly chewy coconut texture
- Crisp chocolate shell
- Rich and sweet without sugar
- Satisfying and filling
STORAGE
- Store in refrigerator for up to 7–10 days
- Store in freezer for up to 1 month
- Keep in airtight container to prevent drying
TIPS FOR BEST RESULTS
- Use full-fat coconut cream for best binding
- Do not skip chilling before coating
- Use high-quality sugar-free chocolate
- Press filling firmly to avoid crumbling
- Keep bars cold while dipping for clean coating
COMMON MISTAKES TO AVOID
- Using sweetened coconut (increases carbs)
- Not chilling filling enough before dipping
- Overheating chocolate (causes grainy texture)
- Making filling too dry or too wet
- Skipping coconut oil in chocolate (makes coating brittle)
OPTIONAL VARIATIONS
- Almond keto bounty bars (add chopped almonds inside filling)
- White chocolate keto bounty bars (use sugar-free white chocolate)
- Protein keto bounty bars (add keto protein powder)
- Extra dark version (90% cocoa chocolate coating)