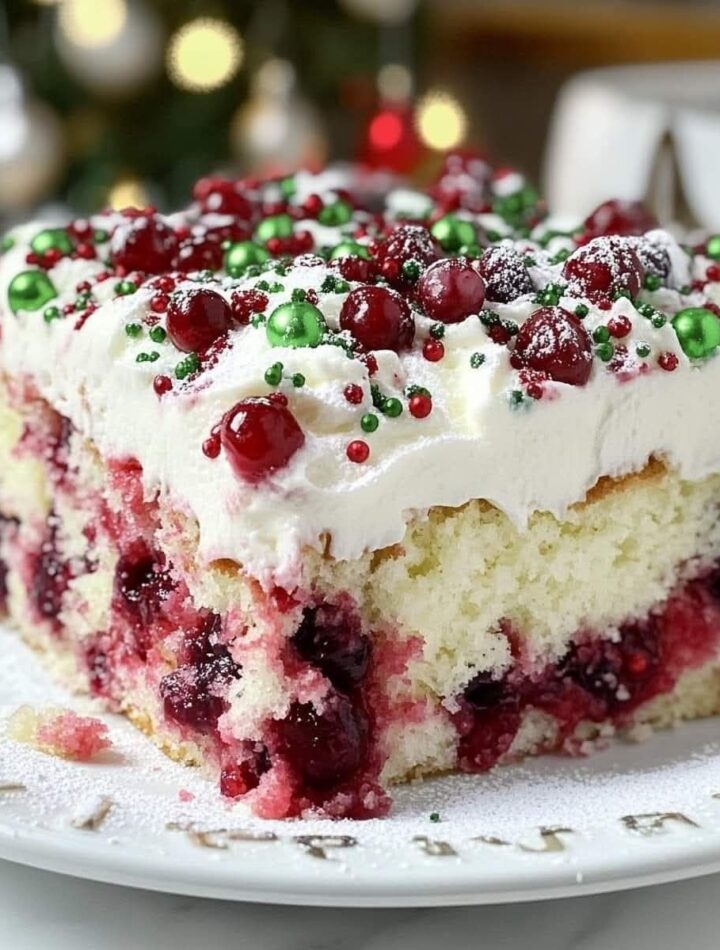
This is a moist, festive-style poke cake made with soft vanilla sponge, cranberry filling that soaks into the cake, and a creamy topping. It is designed to be juicy, flavorful, and visually layered in texture. The “poke” method allows the cranberry sauce to seep into the cake, making every bite rich and slightly tangy.
PART 1: INGREDIENTS
1. Vanilla cake base
- 2 cups all-purpose flour
- 2 teaspoons baking powder
- 1/2 teaspoon baking soda
- 1/4 teaspoon salt
- 1 cup sugar
- 1/2 cup unsalted butter (softened)
- 2 large eggs
- 1 teaspoon vanilla extract
- 1 cup milk (room temperature)
- 1/2 cup sour cream or yogurt (for moisture)
2. Cranberry filling (poke layer)
- 2 cups fresh or frozen cranberries
- 1/2 cup sugar (adjust depending on tartness)
- 1/2 cup water or orange juice
- 1 teaspoon orange zest (optional but recommended)
- 1 teaspoon cornstarch mixed with 2 tablespoons water (slurry for thickening)
3. Cream topping
- 1 1/2 cups whipping cream (cold)
- 1/2 cup cream cheese (softened)
- 1/3 cup powdered sugar
- 1 teaspoon vanilla extract
4. Optional garnish
- Dried cranberries
- Orange zest
- Crushed biscuits or cake crumbs
- White chocolate shavings
- Fresh mint (optional)
PART 2: MAKING THE CAKE BASE
Step 1: Prepare baking pan and oven
- Preheat oven to 180°C (350°F)
- Grease and line a 9×13 inch baking pan
Why:
A larger pan ensures even baking and good space for poke filling.
Step 2: Mix dry ingredients
In a bowl, combine:
- Flour
- Baking powder
- Baking soda
- Salt
Whisk well and set aside.
Step 3: Cream butter and sugar
In a large bowl:
- Beat butter and sugar until light and fluffy
- This takes about 3–5 minutes
Why:
This step traps air and makes the cake soft and airy.
Step 4: Add eggs and flavor
- Add eggs one at a time
- Mix well after each addition
- Add vanilla extract
Step 5: Add wet ingredients
- Add milk
- Add sour cream or yogurt
- Mix until smooth
The batter may look slightly thick and creamy.
Step 6: Combine wet and dry mixtures
- Slowly add dry ingredients into wet mixture
- Fold gently until combined
Do not overmix, or cake becomes dense.
Step 7: Bake
- Pour batter into prepared pan
- Smooth the surface
- Bake for 30–35 minutes
Check:
- Toothpick should come out clean
- Cake should be golden and springy
Step 8: Cool cake
- Let cake cool completely in pan
- Do not poke or add filling while hot
Why:
Hot cake will absorb too much liquid and become soggy.
PART 3: MAKING CRANBERRY FILLING
Step 9: Cook cranberries
In a saucepan:
- Add cranberries
- Add sugar
- Add water or orange juice
Cook on medium heat for 8–10 minutes.
Cranberries will:
- Pop open
- Soften
- Release natural juices
Step 10: Thicken filling
- Add cornstarch slurry
- Stir continuously
Cook for 2–3 more minutes until mixture thickens.
Step 11: Flavor adjustment
- Add orange zest if using
- Taste and adjust sugar if needed
Let mixture cool slightly before using.
PART 4: POKE PROCESS
Step 12: Poke holes
Once cake is fully cooled:
- Use a wooden spoon handle or skewer
- Poke holes evenly across cake
Do not make holes too large or too small.
Step 13: Add cranberry filling
- Pour warm (not hot) cranberry sauce over cake
- Spread evenly so it seeps into holes
Let it sit for:
- 15–30 minutes
Why:
This allows the cake to absorb flavor deeply.
PART 5: MAKING THE CREAM TOPPING
Step 14: Whip cream
- Whip cold cream until soft peaks form
Step 15: Mix cream cheese base
In another bowl:
- Beat cream cheese until smooth
- Add powdered sugar
- Add vanilla extract
Step 16: Combine
- Fold whipped cream into cream cheese mixture
- Mix gently until fluffy and smooth
Do not overmix or cream will lose volume.
PART 6: ASSEMBLY
Step 17: Add topping
- Spread cream layer evenly over cooled cranberry-soaked cake
- Smooth surface using spatula
Step 18: Decoration
Optional toppings:
- Cranberries
- Orange zest
- White chocolate shavings
- Biscuit crumbs
PART 7: CHILLING
Step 19: Refrigerate
- Chill cake for at least 4 hours
- Overnight chilling is best
Why:
- Flavor deepens
- Texture stabilizes
- Layers set properly
PART 8: SERVING
Step 20: Serve cold
- Cut into squares
- Serve directly from fridge
Best when chilled because:
- Cream stays firm
- Cranberry flavor is more balanced
- Cake is moist but not soggy
FINAL RESULT
This Festive Cranberry Poke Cake will be:
- Moist and soft vanilla sponge
- Tangy-sweet cranberry filling absorbed into cake
- Light and creamy topping
- Balanced festive flavor (sweet + tart + creamy)
- Perfect for celebrations and gatherings
TIPS FOR BEST RESULTS
- Let cake cool completely before poking
- Do not make cranberry filling too runny
- Chill properly for best texture
- Use fresh orange zest for stronger festive flavor
- Do not overwhip cream
COMMON MISTAKES TO AVOID
- Adding hot filling to cake (makes it mushy)
- Overbaking cake (it becomes dry)
- Skipping chilling time
- Overmixing cream topping
- Uneven poking (leads to uneven flavor distribution)