Introduction
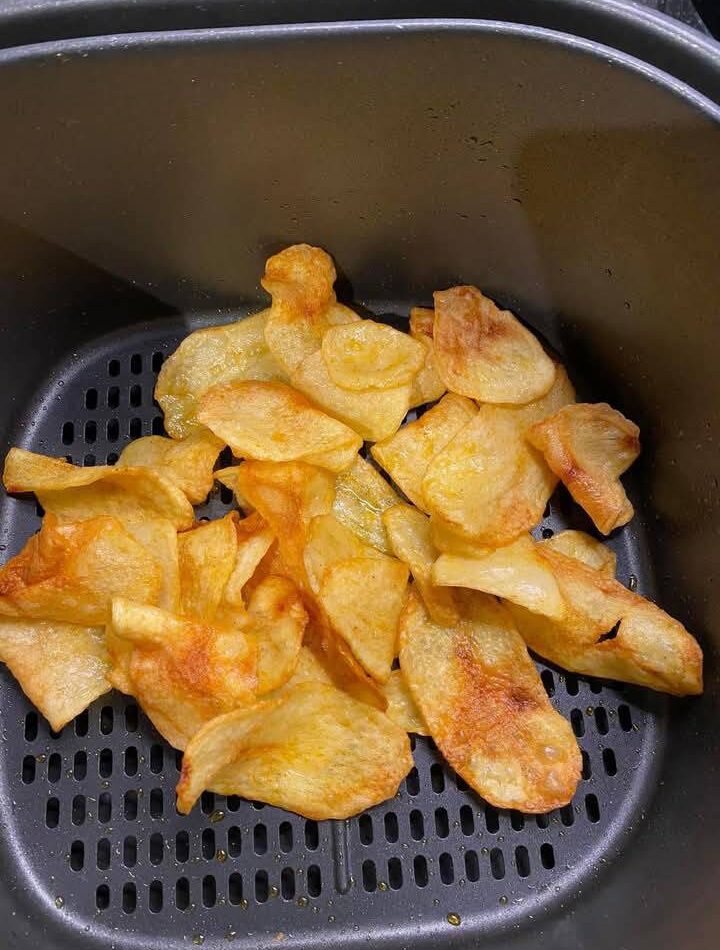
Air Fryer Potato Chips are a simple homemade snack that delivers the satisfying crunch of traditional potato chips while using much less oil than deep-frying. Thinly sliced potatoes are soaked to remove excess starch, dried carefully, lightly coated with oil and seasoning, and then cooked in the air fryer until golden, crisp, and delicious. The result is a batch of homemade chips that can be seasoned exactly the way you like them, whether you prefer classic salted chips, smoky paprika chips, garlic and onion chips, spicy chili chips, barbecue-style chips, or cheesy Parmesan chips.
Making potato chips in the air fryer is especially convenient because there is no need to heat a large pan of oil or deal with splattering oil. The air fryer uses circulating hot air to cook the potatoes, allowing them to become crisp with only a small amount of oil. The process does require some attention because thin potato slices can change from perfectly golden to over-browned very quickly, but once you understand how your particular air fryer behaves, homemade chips become surprisingly easy to prepare.
The most important part of this recipe is slicing the potatoes evenly. Thin, uniform slices cook at approximately the same rate, while uneven slices can cause some chips to burn while others remain soft. A mandoline slicer is helpful because it creates consistent slices, but a sharp knife can also work. You do not need the potatoes to be paper-thin, but thinner slices generally produce a lighter and crunchier chip.
Another important step is soaking the sliced potatoes in cold water. Potatoes naturally contain starch, and excess starch on the surface can make the slices stick together and interfere with crisping. Soaking helps remove some of this surface starch. After soaking, the potatoes must be dried extremely well. Moisture is one of the biggest enemies of crispy air fryer chips, so taking time to pat the slices dry is worth the extra effort.
The amount of oil should also be kept under control. You only need enough to lightly coat the slices. Too much oil can make the chips greasy, while too little may leave them dry and unevenly browned. A tablespoon or two is usually enough for three to four medium potatoes, although the exact amount depends on how many potatoes you use and how thinly they are sliced.
These chips are excellent for casual snacking, movie nights, lunch boxes, parties, family gatherings, or serving alongside sandwiches and burgers. They can be eaten plain or paired with ketchup, mayonnaise, garlic dip, cheese sauce, ranch dressing, or another favorite dip. Because the seasoning can be changed so easily, the same basic recipe can produce many different flavors.
Preparation Time
- Preparation Time: 20 minutes
- Soaking Time: 20–30 minutes
- Drying and Seasoning Time: 10 minutes
- Air Frying Time: 8–18 minutes per batch
- Cooling Time: 5–10 minutes
- Total Time: Approximately 45–60 minutes, depending on the number of batches
Servings
Makes approximately 4–6 snack servings, depending on the size of the potatoes and how thinly they are sliced.
Ingredients
Main Ingredients
- 3–4 medium potatoes
- Russet or Yukon Gold potatoes work especially well.
- 1–2 tablespoons olive oil or vegetable oil
- 1 teaspoon salt, adjusted to taste
Optional Seasonings
- 1/2 teaspoon paprika
- 1/2 teaspoon garlic powder
- 1/2 teaspoon onion powder
- 1/4 teaspoon black pepper
- Chili powder or cayenne pepper, according to taste
- Parmesan cheese, for topping after cooking
- Vinegar, for a salt-and-vinegar-style version
Choosing the Best Potatoes
- The type of potato you use can affect the final texture.
- Russet potatoes are an excellent choice for crispy chips because they contain plenty of starch and have a relatively dry texture. They tend to produce light and crunchy chips when prepared correctly.
- Yukon Gold potatoes also work well. They have a naturally buttery flavor and can produce slightly richer-tasting chips.
- You can experiment with other potato varieties, but potatoes with a higher moisture content may behave differently and may require additional cooking time.
- When choosing potatoes, look for firm potatoes without soft areas, excessive sprouts, or green patches.
Step 1: Wash the Potatoes
- Begin by washing the potatoes thoroughly under cool running water.
- Even if you plan to peel them, washing the potatoes first removes dirt and debris from the skin.
- You can peel the potatoes completely if you prefer traditional-looking chips.
- Alternatively, you can leave the skin on.
- Skin-on chips have a slightly more rustic appearance and can provide additional flavor and texture.
- If you leave the skin on, make sure the potatoes are scrubbed thoroughly.
Step 2: Slice the Potatoes
- Using a sharp knife, mandoline slicer, or food processor fitted with an appropriate slicing blade, slice the potatoes very thinly.
- Aim for slices that are approximately 1–2 millimeters thick if possible.
- You do not have to measure every slice precisely, but consistency is important.
- Very thin slices will generally become crisp more quickly.
- Slightly thicker slices will take longer and may have a more substantial potato texture.
- Try to avoid having some slices paper-thin and others much thicker.
- If you are using a knife, take your time.
- Keep the potato stable on the cutting board and use careful, controlled movements.
- A mandoline can make the process much faster, but always use the safety guard or another appropriate method of protecting your fingers.
Step 3: Soak the Potato Slices
- Place the sliced potatoes into a large bowl filled with cold water.
- Make sure the slices are submerged.
- Let them soak for approximately 20–30 minutes.
- During this time, some of the excess starch will move from the potato surfaces into the water.
- You may notice that the water becomes cloudy.
- This is normal.
- The soaking step helps prevent the slices from sticking together and can contribute to a crisper final texture.
Step 4: Rinse the Potatoes
- After soaking, drain the potatoes.
- Rinse the slices once or twice under cold water.
- This removes some of the starch that has been released during soaking.
- Handle the slices gently so they do not break.
Step 5: Dry the Potatoes Thoroughly
- Spread the potato slices over a clean kitchen towel or several layers of paper towels.
- Pat them dry carefully.
- You can place another towel over the top and gently press down.
- The slices should be as dry as possible before oil and seasoning are added.
- This is one of the most important steps in the entire recipe.
- If the potatoes are still wet, they may steam instead of crisping properly.
- If necessary, allow them to sit uncovered for several minutes after patting them dry.
Step 6: Prepare the Seasoning
- Place the dry potato slices into a large bowl.
- Add the olive oil or vegetable oil.
- Start with 1 tablespoon and add a little more only if necessary.
- Sprinkle in the salt.
- If you want seasoned chips, add paprika, garlic powder, onion powder, black pepper, chili powder, or cayenne pepper.
- Toss everything gently with your hands or a large spoon.
- Try to separate the potato slices as you toss them so that the oil and seasoning reach as many surfaces as possible.
- The potatoes should have a light coating rather than appearing heavily covered in oil.
Step 7: Do Not Over-Oil
- It can be tempting to add extra oil because you want crispy chips, but too much oil can actually work against you.
- The air fryer does not require the potatoes to be submerged in oil.
- A thin coating is enough.
- Too much oil can make the chips greasy and may cause seasoning to slide off the surface.
- If the slices look lightly glossy after tossing, that is generally sufficient.
Step 8: Preheat the Air Fryer
- Preheat the air fryer to 180°C (350°F) for approximately 3–5 minutes.
- Preheating gives the potatoes an immediate burst of heat when they enter the basket.
- It can also help them cook more evenly.
- Some air fryer models do not require preheating, but if your appliance allows it, preheating can be useful for this recipe.
Step 9: Arrange the Potato Slices
- Place the potato slices in the air fryer basket.
- Try to arrange them in a single layer.
- Do not pile large quantities of potato slices on top of one another.
- Proper airflow is essential for crisping.
- If the basket is overcrowded, the potatoes may steam rather than become crunchy.
- Depending on the size of your air fryer, you may need to cook several batches.
- Although cooking multiple batches takes more time, it usually produces much better results than overcrowding the basket.
Step 10: Begin Air Frying
- Cook the potato slices at 180°C (350°F).
- Very thin slices may take approximately 8–10 minutes.
- Medium slices may take approximately 10–15 minutes.
- Thicker slices may require up to approximately 18 minutes.
- These times are only general guidelines because air fryers vary considerably.
- The number of potato slices in the basket, their thickness, moisture content, and the strength of your air fryer can all affect cooking time.
Step 11: Shake the Basket
- Around halfway through cooking, carefully shake the air fryer basket.
- This helps separate the slices and encourages more even cooking.
- If some chips are already browning faster than others, remove those finished chips and continue cooking the remaining slices.
- This is especially important when slices are not perfectly uniform.
Step 12: Watch Closely Near the End
- Potato chips can burn quickly during the final few minutes.
- Once the moisture has evaporated, the slices can change color rapidly.
- Keep an eye on them near the end of cooking.
- The chips should become golden and crisp.
- A few darker edges are fine, but avoid allowing the entire batch to become very dark.
- If your air fryer runs particularly hot, you may need to reduce the temperature slightly.
Step 13: Remove the Finished Chips
- Once the potato chips are golden and crisp, carefully remove them from the air fryer.
- Place them on a plate or wire rack.
- Do not immediately pile very hot chips into a deep container because trapped steam can soften them.
- Spread them out in a single layer while they cool.
Step 14: Let the Chips Cool
- Allow the chips to cool for approximately 5–10 minutes.
- This is an important part of the process.
- Potato chips often become even crispier as they cool because remaining moisture continues to evaporate.
- A chip that seems slightly soft immediately after cooking may become much crunchier after a few minutes.
- Avoid judging the final texture while the chips are still extremely hot.
Step 15: Add Final Seasoning
- Taste one cooled chip.
- If necessary, add a little extra salt.
- For Parmesan chips, sprinkle finely grated Parmesan cheese over the warm chips immediately after cooking.
- You can also add a small amount of dried herbs or additional seasoning at this stage.
- Adding some seasonings after cooking can help preserve their flavor and prevent them from becoming too strong during the cooking process.
Classic Salted Potato Chips
- For traditional homemade chips, keep the seasoning simple.
- Use only oil and salt.
- The natural potato flavor becomes the main focus.
- This version is especially good with ketchup or a creamy dip.
Paprika Potato Chips
- Add 1/2 teaspoon of paprika to the seasoning mixture.
- Paprika gives the chips a mild smoky and slightly sweet flavor.
- For a deeper smoky taste, smoked paprika can be used.
- The color will also become warmer and more golden.
Garlic Potato Chips
- Add approximately 1/2 teaspoon of garlic powder.
- Garlic powder distributes more evenly than fresh garlic and is less likely to burn during air frying.
- You can combine garlic powder with black pepper and a small amount of paprika.
Garlic and Onion Chips
- Combine garlic powder and onion powder for a savory seasoning blend.
- This combination gives the chips a familiar snack-food flavor without requiring a complicated spice mixture.
Spicy Potato Chips
- For spicy chips, add chili powder or cayenne pepper.
- Start with a small amount and increase it according to your preferred heat level.
- You can also combine chili powder with paprika and garlic powder.
- For an especially spicy version, add a little cayenne after cooking.
Salt and Vinegar Potato Chips
- For a salt-and-vinegar style, lightly sprinkle vinegar over the potato slices after soaking and drying, or use a very small amount during seasoning.
- The key is not to add too much liquid because excess moisture can interfere with crisping.
- A vinegar powder or dry vinegar seasoning can also be used if available.
- Finish with salt after cooking.
Parmesan Potato Chips
- Parmesan cheese is best added after the chips have finished cooking.
- While the chips are still warm, sprinkle finely grated Parmesan over them.
- The residual heat helps the cheese cling to the surface.
- You can combine Parmesan with garlic powder, black pepper, and dried parsley.
Barbecue-Style Chips
- Use a barbecue seasoning blend after cooking.
- You can also combine paprika, garlic powder, onion powder, black pepper, and a small amount of chili powder.
- Taste before adding extra salt because many prepared barbecue seasonings already contain salt.
Ranch-Style Chips
- After cooking, lightly sprinkle ranch seasoning over the warm chips.
- Toss gently to distribute the seasoning.
- Use a moderate amount because packaged seasoning can be salty.
Peri-Peri Chips
- For a spicy peri-peri-inspired version, use chili powder, paprika, garlic powder, black pepper, and salt.
- Adjust the amount of chili according to your preference.
- These chips are excellent with a cooling yogurt or mayonnaise-based dip.
Sweet Potato Chips
- Sweet potatoes can be prepared using a similar method.
- Slice them thinly and evenly.
- Soak if desired, dry thoroughly, add a light coating of oil, and season according to taste.
- Sweet potatoes can brown more quickly because of their natural sugars, so watch them carefully near the end.
- A pinch of cinnamon can create a sweet version, while paprika and chili create a savory combination.
Why Soaking Matters
- Potatoes contain starch, and a portion of that starch sits on the surface of the slices after cutting.
- If the slices go directly into the air fryer without soaking, they may not crisp as effectively.
- Soaking helps remove some of this surface starch.
- The water also helps prevent slices from sticking together during preparation.
- However, soaking alone does not guarantee crispiness.
- The potatoes must be dried thoroughly afterward.
- Wet potato slices can take longer to crisp and may become soft.
Why Drying Is So Important
- Crispness depends heavily on removing moisture.
- The air fryer needs to evaporate the water contained in and around the potato slices.
- If the surface is wet, the early stage of cooking may produce steam rather than crispness.
- Patting the slices dry with a clean towel is therefore one of the most important preparation steps.
- Take your time with this step.
How Thin Should the Slices Be?
- For very crisp chips, aim for thin slices.
- A thickness of approximately 1–2 millimeters is a useful target.
- If you make them extremely thin, they can become fragile and may cook very quickly.
- If you make them thicker, they may have more of a roasted potato texture rather than the classic crisp chip texture.
- The most important thing is consistency.
Using a Mandoline
- A mandoline slicer is particularly useful because it produces uniform slices quickly.
- Uniform slices are valuable because they tend to finish cooking at approximately the same time.
- Always use the safety guard or another appropriate protective method when using a mandoline.
- Never rush the slicing process.
Using a Knife
- A sharp knife can produce excellent chips.
- Place the potato securely on a cutting board.
- Cut thin slices with controlled movements.
- If necessary, cut the potato in half first so that it has a stable flat surface.
- Take extra care because thin slicing requires the knife to be close to your fingers.
Cooking in Batches
- Cooking in batches is one of the best ways to improve results.
- It may take longer, but each slice has more exposure to circulating hot air.
- A crowded basket traps moisture and prevents the chips from crisping evenly.
- If your air fryer basket is small, plan for several batches.
- Keep the finished chips spread out while subsequent batches cook.
Keeping Finished Chips Crisp
- Do not immediately place hot chips into a sealed container.
- Allow them to cool first.
- Once completely cool, place them into an airtight container.
- If they are still warm when sealed, condensation can form inside the container and soften the chips.
Storage
- Store completely cooled potato chips in an airtight container.
- They are best consumed within 1–2 days for maximum crispness.
- Homemade chips generally do not stay as crisp as commercially packaged chips because they do not contain the same processing and packaging methods.
- For the best texture, prepare only as many as you expect to eat within a short period.
Reheating
- If the chips lose some of their crispness, place them back into the air fryer.
- Heat them at approximately 160°C (320°F) for 2–3 minutes.
- Watch them carefully because thin chips can burn quickly.
- Allow them to cool for a few minutes after reheating.
- They should regain some of their crunch.
Double Air Frying Method
- For extra crunch, you can try a double-cooking method.
- Air fry the chips until they are mostly cooked but not deeply browned.
- Remove them and allow them to rest for several minutes.
- Return them to the air fryer for a short additional cooking period.
- This can help remove additional moisture and create a particularly crisp texture.
- Keep a close eye on the second cooking stage because the chips can brown rapidly.
Tips for Best Results
- Use firm, fresh potatoes.
- Slice the potatoes evenly.
- Soak the slices in cold water.
- Rinse after soaking.
- Dry the slices extremely well.
- Use only a light coating of oil.
- Do not overcrowd the basket.
- Preheat the air fryer when possible.
- Shake the basket during cooking.
- Watch carefully near the end.
- Remove darker chips before they burn.
- Allow chips to cool before judging their crispness.
- Add Parmesan and delicate seasonings after cooking when appropriate.
Troubleshooting Soft Chips
- If your chips remain soft, there are several possible causes.
- The slices may have been too thick.
- The potatoes may not have been dried thoroughly.
- The basket may have been overcrowded.
- The air fryer temperature may have been too low.
- The chips may simply need a few additional minutes of cooking.
- Try cooking a smaller batch with thinner slices and better drying.
Troubleshooting Burnt Chips
- If the chips burn before becoming evenly crisp, they may be too thin for the temperature being used.
- Your air fryer may also run hotter than expected.
- Reduce the temperature slightly and check the chips earlier.
- Remove chips as soon as they become golden and crisp.
- Do not wait for every chip to reach exactly the same color if some are already finished.
Troubleshooting Uneven Cooking
- Uneven cooking is usually caused by uneven slicing or overcrowding.
- Try to keep the slices similar in thickness.
- Shake the basket halfway through cooking.
- You may also need to cook smaller batches.
Flavor Profile
- Classic Air Fryer Potato Chips have a light potato flavor with a pleasant salty taste and a satisfying crunch.
- The outside becomes crisp while the interior can retain a delicate potato flavor.
- Paprika adds warmth and smokiness.
- Garlic powder adds savory depth.
- Onion powder contributes sweetness and richness.
- Black pepper adds gentle heat.
- Chili or cayenne creates a spicy finish.
- Parmesan provides a salty, nutty, cheesy flavor.
- Because the basic potato flavor is mild, the chips are ideal for experimenting with seasonings.
Serving Suggestions
- Serve the chips with ketchup.
- Serve them with mayonnaise.
- Try garlic mayonnaise.
- Serve them with cheese sauce.
- Pair them with ranch dip.
- Serve with a yogurt-based dip.
- Add them to a sandwich or burger plate.
- Serve them alongside grilled chicken.
- Use them as a crunchy side for wraps.
- Place them in a snack bowl for movie night.
- They can also be served as part of a casual party snack platter.
Potato Chips With Garlic Dip
- A creamy garlic dip pairs beautifully with crispy potato chips.
- The cool, creamy dip contrasts with the warm, crunchy chips.
- A simple garlic and yogurt dip can also provide a lighter option.
Potato Chips With Cheese Sauce
- For a richer snack, serve the chips with warm cheese sauce.
- The crisp chips provide a crunchy contrast to the smooth sauce.
- Add chili flakes or jalapeños if you enjoy spicy flavors.
Potato Chips With Burgers
- Homemade air fryer potato chips are an excellent side dish for burgers.
- They can be seasoned with simple salt and pepper or a barbecue-style spice blend.
- Serve them immediately so they remain crisp.
Potato Chips With Sandwiches
- Instead of serving a sandwich with traditional fried potatoes, add a handful of homemade air fryer chips on the side.
- They provide a satisfying crunch without requiring deep frying.
Movie Night Snack
- Prepare a batch of classic salted chips or create several flavors.
- For example, make one batch with paprika, one with garlic and onion, and another with chili seasoning.
- Place them in separate bowls so everyone can choose a favorite.
Party Snack
- For a party, prepare several seasoning combinations.
- Keep the chips plain initially and season them in separate bowls after cooking.
- This allows one batch of potatoes to become several different flavors.
Nutritional Benefits
- Potatoes provide carbohydrates that can contribute energy to the diet.
- They also contain nutrients such as potassium and vitamin C.
- Using a small amount of oil instead of deep-frying significantly reduces the amount of added oil used in the cooking process.
- The overall nutritional content still depends on portion size, the amount of oil used, and the toppings or dips served with the chips.
- For a balanced snack, serve a moderate portion alongside a protein-rich or vegetable-based dip.
Healthier Preparation
- Although air fryer chips use less oil than traditional deep-fried chips, they are still a snack food.
- Keeping the oil moderate and avoiding excessive salt can make the recipe lighter.
- You can also serve the chips with homemade yogurt-based dips or fresh vegetables.
- The goal is to enjoy the crunch while keeping the overall snack balanced.
Making the Chips Extra Crisp
- The three most important factors are slicing, drying, and airflow.
- Slice the potatoes thinly.
- Dry them extremely well.
- Cook them in a single layer.
- If needed, use multiple batches.
- Do not rush the process by filling the basket with too many slices.
- A smaller batch often produces much better chips.