This is a complete guide to making soft, thick, and fluffy pancakes with a light texture and golden exterior. These pancakes rise well, stay tender inside, and have a mild sweetness that pairs perfectly with syrup, fruits, or spreads.
PART 1: INGREDIENTS
1. Dry ingredients
- 1 1/2 cups all-purpose flour
- 2 tablespoons sugar
- 1 tablespoon baking powder
- 1/2 teaspoon salt
2. Wet ingredients
- 1 1/4 cups milk (room temperature)
- 1 large egg
- 3 tablespoons melted butter (or neutral oil)
- 1 teaspoon vanilla extract
3. Optional add-ins
- Chocolate chips
- Blueberries
- Banana slices
- Cinnamon powder (1/2 teaspoon for flavor variation)
PART 2: MAKING THE BATTER
Step 1: Mix dry ingredients
In a large bowl:
- Add flour
- Add sugar
- Add baking powder
- Add salt
Whisk well to evenly distribute baking powder.
Why:
Even mixing ensures uniform rise and fluffiness.
Step 2: Mix wet ingredients
In another bowl:
- Add milk
- Add egg
- Add melted butter
- Add vanilla extract
Whisk until fully combined.
Step 3: Combine wet and dry mixtures
- Pour wet mixture into dry ingredients
- Stir gently using a spatula or whisk
Important:
Do not overmix. A few small lumps are fine.
Why:
Overmixing develops gluten and makes pancakes dense instead of fluffy.
Step 4: Rest the batter
Let batter rest for:
- 10 to 15 minutes
Why:
Resting allows flour to hydrate and baking powder to activate, improving texture.
PART 3: COOKING THE PANCAKES
Step 5: Heat the pan
- Use a non-stick pan or griddle
- Heat on low to medium heat
- Lightly grease with butter or oil
Important:
Too high heat burns outside while leaving inside raw.
Step 6: Pour batter
- Pour about 1/4 cup batter per pancake
- Do not spread it too much
Let it naturally form a round shape.
Step 7: First side cooking
Cook until:
- Bubbles form on surface
- Edges look slightly set
- Bottom is golden brown
This takes about 2–3 minutes.
Step 8: Flip pancake
- Flip carefully using a spatula
- Cook second side for 1–2 minutes
Do not press pancake down.
Why:
Pressing removes air and reduces fluffiness.
Step 9: Repeat process
Continue with remaining batter:
- Grease pan lightly between batches if needed
PART 4: SERVING
Step 10: Serve warm
Stack pancakes and serve immediately.
Popular toppings:
- Maple syrup or honey
- Butter
- Fresh fruits
- Nutella or chocolate spread
- Yogurt or whipped cream
TEXTURE AND FLAVOR PROFILE
These pancakes will be:
- Soft and airy inside
- Lightly crisp outside
- Slightly sweet
- Moist and fluffy
- Mild vanilla flavor
TIPS FOR BEST RESULTS
- Do not overmix batter
- Always let batter rest
- Use fresh baking powder
- Cook on medium-low heat for even cooking
- Do not press pancakes while cooking
COMMON MISTAKES TO AVOID
- Overmixing batter (makes pancakes dense)
- High heat cooking (burns outside, raw inside)
- Skipping resting time
- Using old baking powder
- Over-flipping pancakes
VARIATIONS
- Banana pancakes (add mashed banana to batter)
- Chocolate pancakes (add cocoa powder)
- Blueberry pancakes (fold in fresh blueberries)
- Protein pancakes (add protein powder, adjust milk)
- Buttermilk pancakes (replace milk with buttermilk for extra fluffiness)
If you want, I can also give:
- ultra fluffy restaurant-style pancakes
- Japanese soufflé pancakes (extra tall and airy)
- or air fryer pancake bites recipe
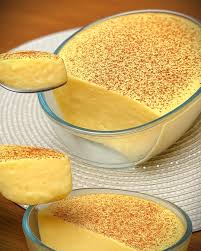
Citrus Ricotta Cream Dessert long recipe without emojis
Citrus Ricotta Cream Dessert (Long Detailed Recipe)
This is a light, creamy, no-bake dessert made with ricotta cheese and fresh citrus flavors. It is smooth, slightly tangy, naturally refreshing, and can be served in glasses, bowls, or layered dessert cups. The combination of ricotta and citrus creates a balance between richness and freshness.
PART 1: INGREDIENTS
1. Cream base
- 2 cups ricotta cheese (fresh, well-drained)
- 1 cup heavy cream (cold)
- 1/2 cup powdered sugar (adjust to taste)
- 1 teaspoon vanilla extract
2. Citrus flavoring
- Zest of 1 orange
- Zest of 1 lemon
- 2 to 3 tablespoons orange juice (fresh)
- 1 to 2 tablespoons lemon juice (adjust for tartness)
- Optional: 1 teaspoon lime juice for extra brightness
3. Optional texture and layering
- Crushed biscuits or graham crackers (1 to 1.5 cups)
- Honey or citrus syrup for drizzling
- Fresh fruit (orange segments, berries, kiwi)
- Toasted almonds or pistachios
PART 2: PREPARING THE RICOTTA BASE
Step 1: Prepare ricotta
- Place ricotta in a bowl
- If watery, drain it using a fine sieve or cloth for 10–15 minutes
Why:
Too much moisture will make the dessert runny instead of creamy.
Step 2: Whip the cream
- In a separate bowl, whip cold heavy cream
- Whip until soft peaks form
Do not overwhip or it will become grainy.
Step 3: Sweeten ricotta
In the ricotta bowl add:
- Powdered sugar
- Vanilla extract
Mix until smooth and creamy.
Step 4: Add citrus flavor
Add:
- Orange zest
- Lemon zest
- Orange juice
- Lemon juice
Mix gently.
Important:
Add citrus gradually and taste as you go to balance sweetness and acidity.
Step 5: Combine cream and ricotta
- Gently fold whipped cream into ricotta mixture
- Use a spatula and fold slowly
Do not mix aggressively or texture will collapse.
Result:
Light, fluffy, mousse-like cream.
PART 3: ASSEMBLY OPTIONS
You can serve this dessert in multiple styles.
OPTION 1: Layered dessert cups
Step 6: Prepare base layer
- Add crushed biscuits at bottom of glass
- Lightly press
Optional: drizzle honey or citrus syrup.
Step 7: Add cream layer
- Spoon citrus ricotta cream over base
- Smooth gently
Step 8: Repeat layers
- Alternate biscuits and cream
- Finish with cream on top
OPTION 2: Bowl-style dessert
- Simply place all cream in a serving bowl
- Smooth top
- Add toppings
PART 4: TOPPINGS AND FINISHING
Step 9: Add toppings
Choose from:
- Orange segments
- Lemon zest sprinkle
- Fresh berries
- Chopped pistachios or almonds
- Honey drizzle
Step 10: Chill
Refrigerate for:
- At least 2 to 3 hours
- Best overnight
Why:
Chilling helps flavors blend and improves texture.
PART 5: SERVING
Step 11: Serve cold
Serve directly from fridge.
Best presentation:
- In glass cups for layered look
- Or scooped into bowls with fruit topping
TEXTURE AND FLAVOR PROFILE
This Citrus Ricotta Cream Dessert is:
- Light and airy like mousse
- Creamy but not heavy
- Bright and refreshing from citrus
- Slightly sweet with tangy notes
- Smooth with optional crunchy layers
TIPS FOR BEST RESULTS
- Use well-drained ricotta for best texture
- Do not overwhip cream
- Adjust citrus slowly to avoid overpowering flavor
- Chill before serving for best consistency
- Use fresh citrus zest, not bottled juice if possible
COMMON MISTAKES TO AVOID
- Using wet ricotta (makes dessert runny)
- Overmixing whipped cream (causes deflation)
- Adding too much lemon juice (can curdle mixture slightly)
- Skipping chilling time
- Over-sweetening, which hides citrus freshness
VARIATIONS
- Berry citrus ricotta dessert (add strawberries or blueberries)
- Chocolate citrus version (add cocoa powder swirl)
- Low-sugar version (use sweetener instead of sugar)
- Layered cake-style version (with sponge layers)
- Frozen ricotta dessert (semi-frozen like ice cream texture)