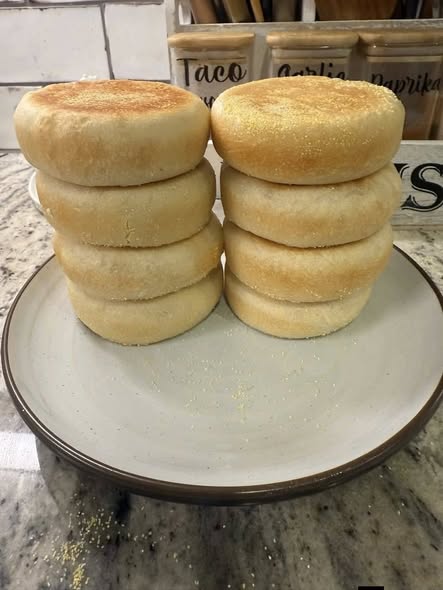
these gluten-free English muffins are soft, chewy, lightly crisp when toasted, and have the classic “nooks and crannies” texture. Unlike traditional English muffins, they rely on a gluten-free flour blend and a thicker batter-like dough. This recipe is beginner-friendly and produces about 8–10 large muffins.
Yield
- 8–10 English muffins
Preparation Time
- Active time: 25–30 minutes
- Rising time: 60–90 minutes
- Cooking time: 20–25 minutes
Ingredients
Dry Ingredients
- 3 cups (420 g) gluten-free all-purpose flour blend (contains xanthan gum)
- 2 tablespoons sugar
- 2¼ teaspoons instant yeast (1 packet)
- 1 teaspoon salt
- 1 teaspoon baking powder
Wet Ingredients
- 1¼ cups (300 ml) warm milk (dairy or unsweetened plant milk)
- 2 large eggs, room temperature
- 3 tablespoons melted butter or neutral oil
- 1 teaspoon apple cider vinegar
- 1 teaspoon honey (optional, helps yeast activity)
For Dusting
- ½ cup cornmeal or gluten-free coarse corn flour
Optional Flavor Enhancers
- ½ teaspoon garlic powder
- ½ teaspoon onion powder
- 1 tablespoon dried herbs
- 1 tablespoon honey for slightly sweeter muffins
Equipment
- Large mixing bowl
- Whisk
- Measuring cups and spoons
- Electric mixer (helpful but optional)
- Baking sheet or tray
- Parchment paper
- Large skillet, griddle, or nonstick pan
- Cooking rings or English muffin rings (optional)
Step 1: Activate the Yeast
- Warm the milk to about 105–110°F (40–43°C).
- Pour the warm milk into a bowl.
- Add the sugar and honey.
- Sprinkle the yeast over the surface.
- Stir gently.
- Let sit for 5–10 minutes.
The mixture should become foamy. If it doesn’t foam, the yeast may be inactive and should be replaced.
Step 2: Mix the Dry Ingredients
In a large mixing bowl combine:
- Gluten-free flour blend
- Salt
- Baking powder
Whisk thoroughly to distribute everything evenly.
This step helps prevent uneven texture and improves rise.
Step 3: Mix the Wet Ingredients
In another bowl whisk together:
- Eggs
- Melted butter
- Apple cider vinegar
The vinegar helps improve texture and tenderness in gluten-free baking.
Step 4: Make the Dough
- Add the wet ingredients to the dry ingredients.
- Pour in the yeast mixture.
- Mix until fully combined.
The dough will not look like traditional bread dough.
Instead, it should resemble:
- Very thick cake batter
- Sticky bread dough
- Soft scoopable mixture
If it seems extremely stiff:
- Add 1–2 tablespoons milk.
If too runny:
- Add 1–2 tablespoons gluten-free flour.
Mix for 3–5 minutes to fully hydrate the flour.
Step 5: First Rise
- Cover the bowl with plastic wrap or a damp towel.
- Place in a warm location.
Allow to rise for:
- 60–90 minutes
The dough should become noticeably puffier, though gluten-free dough usually doesn’t double dramatically.
Good rising locations:
- Oven with light on
- Warm kitchen counter
- Near a warm appliance
Step 6: Prepare the Muffins
- Line a baking tray with parchment paper.
- Generously sprinkle cornmeal over the parchment.
Using a large spoon or ice cream scoop:
- Scoop portions of dough.
- Place onto the cornmeal.
- Shape gently into rounds approximately:
- 3½–4 inches wide
- 1 inch thick
Dust tops with more cornmeal.
Optional Ring Method
For perfectly round English muffins:
- Grease English muffin rings.
- Place rings on parchment.
- Fill each ring about halfway.
- Smooth the tops with wet fingers.
- Dust with cornmeal.
The rings help create bakery-style muffins.
Step 7: Second Rise
Cover the shaped muffins loosely.
Let rise:
- 20–30 minutes
They should appear slightly puffed and airy.
Step 8: Cook the English Muffins
Heat a large skillet or griddle over low to medium-low heat.
The temperature is very important.
Too hot:
- Burned outside
- Raw inside
Too cool:
- Dense muffins
Lightly grease the pan.
Carefully transfer muffins to the skillet.
Cook:
First Side
- 7–10 minutes
Second Side
- 7–10 minutes
Flip gently.
The muffins should become:
- Golden brown
- Firm
- Fully cooked
Internal temperature should reach about 200°F (93°C) if using a thermometer.
Step 9: Finish in the Oven (Optional but Recommended)
For guaranteed doneness:
- Preheat oven to 350°F (175°C).
- Place skillet-cooked muffins on a baking sheet.
- Bake 8–10 minutes.
This step ensures the centers are fully cooked.
Step 10: Cool Properly
Transfer muffins to a cooling rack.
Allow to cool for at least:
- 20–30 minutes
Cutting too early can make them gummy.
Patience improves texture significantly.
How to Split English Muffins Correctly
For the classic texture:
- Insert a fork around the edge.
- Work all the way around.
- Pull apart with hands.
Avoid slicing straight through with a knife.
Fork-splitting creates the famous nooks and crannies.
Serving Ideas
Breakfast Sandwich
Fill with:
- Fried egg
- Cheese
- Turkey bacon or sausage
Sweet Version
Top with:
- Butter
- Honey
- Jam
- Peanut butter
Pizza Muffins
Add:
- Pizza sauce
- Mozzarella
- Herbs
Avocado Muffins
Top with:
- Mashed avocado
- Tomato
- Black pepper
Storage
Room Temperature
- Up to 2 days in airtight container
Refrigerator
- Up to 5 days
Freezer
- Up to 3 months
Freeze individually wrapped muffins for easy use.
Reheating
Toaster
- 2–3 minutes
Oven
- 350°F (175°C) for 5–8 minutes
Air Fryer
- 320°F (160°C) for 3–4 minutes
Troubleshooting
Muffins Are Dense
Possible causes:
- Old yeast
- Insufficient rise time
- Dough too dry
Muffins Are Gummy
Possible causes:
- Undercooked center
- Cut before cooling
Muffins Spread Too Much
Possible causes:
- Dough too wet
- Need muffin rings
Muffins Burn Outside
Possible causes:
- Heat too high
- Pan not evenly heated
Baker’s Tips for the Best Gluten-Free English Muffins
- Weigh ingredients if possible for consistency.
- Use room-temperature eggs.
- Allow full rise times.
- Cook slowly over gentle heat.
- Finish in the oven for perfect centers.
- Always fork-split before toasting.
- Toast before serving for the best flavor and texture.
- Cornmeal coating adds authentic English muffin character.
- A quality gluten-free flour blend greatly improves results.
- These muffins often taste even better the next day after a quick toast.
Enjoy your homemade gluten-free English muffins warm with butter, jam, or your favorite breakfast fillings.